最近公司上线一套基于docker的spring cloud微服务系统,记录一下相关的监控技术。
spring boot监控
actuator
Spring Boot 包含了一系列的附加特性,来帮助你监控和管理生产环境下运行时的应用程序。你可以通过HTTP endpoints、JMX或者SSH来监控和管理应用——健康状况、系统指标、参数信息、内存状况等等。
添加依赖:
1 | <dependency> |
admin-dashboard
Spring Boot Admin是一个管理和监控Spring Boot应用的项目。我们可以通过Spring Boot Admin的客户端运行,也可以Spring Cloud中注册为一个服务(比如:注册到Eureka中)。Spring Boot Amin仅仅是一个建立在Spring Boot Actuator端点上的AngularJS的应用。
只好不要集成在业务系统中,可以单独建立一个project。只需要进行以下添加:
添加依赖:
1 | <dependency> |
启动类添加:
1 |
配置:
1 | server: |
效果: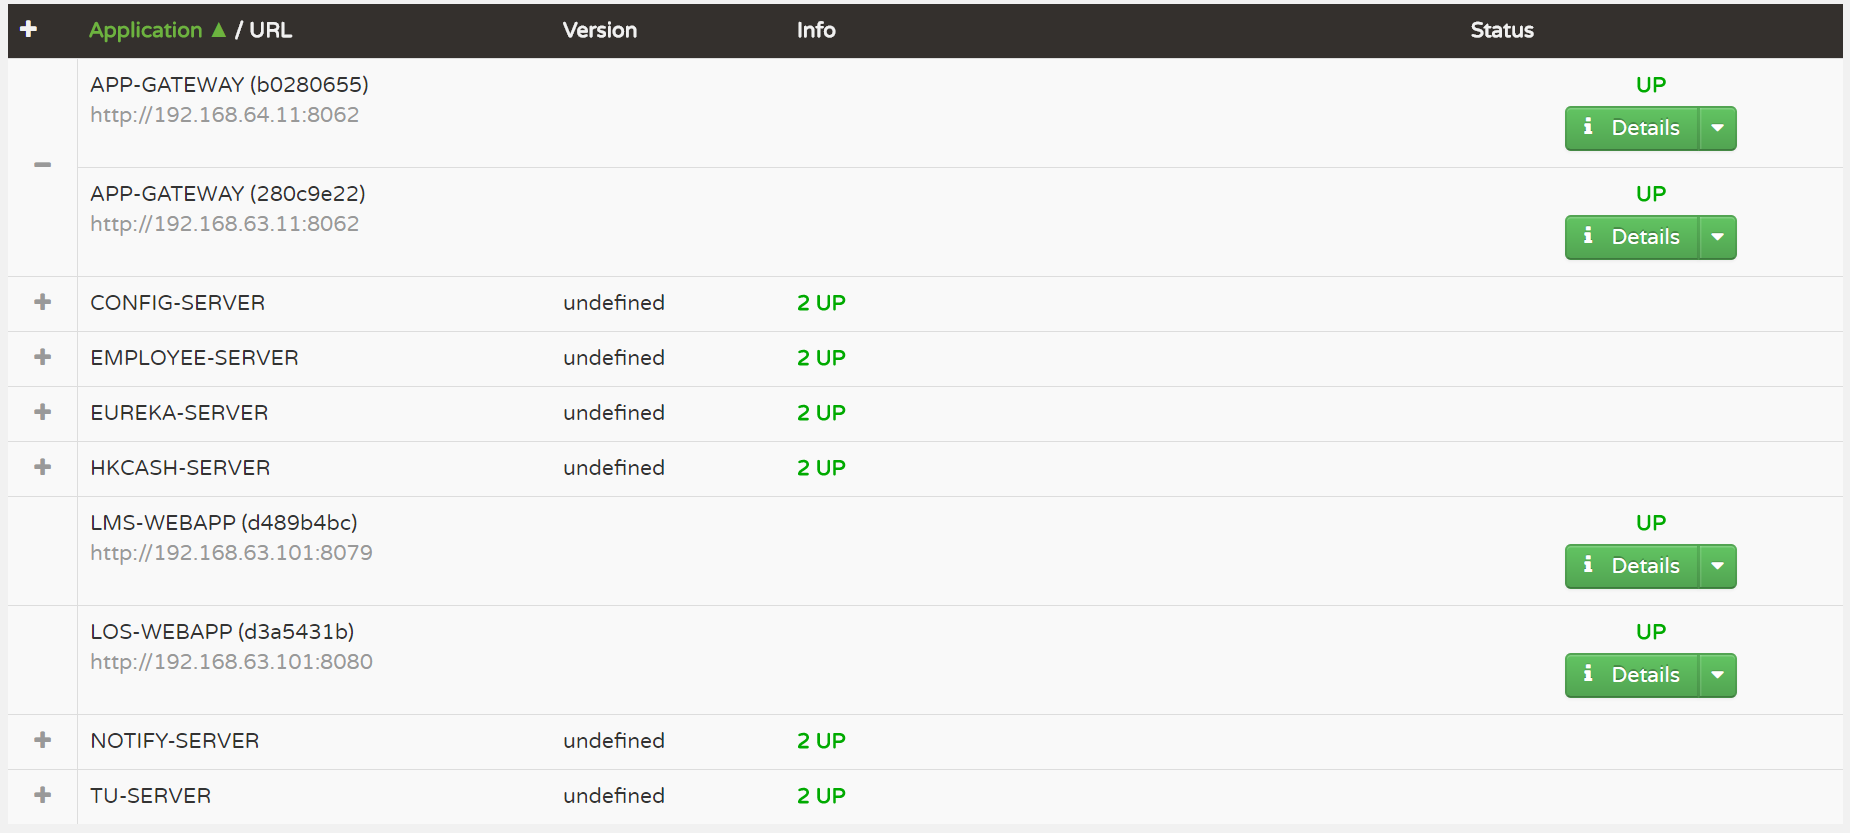
prometheus日志收集
Prometheus用于收集actuator的信息,再在grafana中进行显示。
添加依赖:
1 | <dependency> |
启动类添加:
1 |
配置:
1 | # prometheus endpoint, enabled default false |
也可以对某个接口作数据收集:
1 | private final Gauge getErrorTaskListRequests = Gauge.build() |
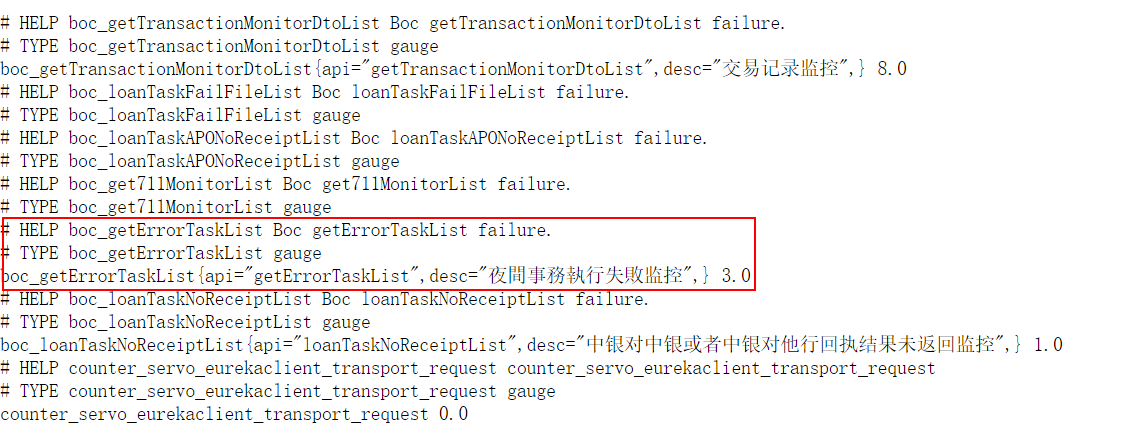
访问:
http://ip:port/ops/prometheus
prometheus
参考:https://segmentfault.com/a/1190000008629939
Prometheus 是使用 Golang 开发的开源监控系统,被人称为下一代监控系统,是为数不多的适合 Docker、Mesos 、Kubernetes 环境的监控系统之一 。
安装
1 | docker run -d --name prometheus -p 9090:9090 -v \ |
配置
prometheus.yml相关配置如下:1
2
3
4
5
6
7
8
9
10
11
12
13
14
15
16
17
18
19
20
21
22
23
24
25
26
27
28
29
30
31
32
33
34
35
36
37
38
39
40
41
42
43
44
45
46
47
48
49
50
51
52
53
54
55
56
57
58
59
60
61
62
63
64
65
66
67
68
69
70
71
72
73
74
75
76
77
78
79
80
81
82
83
84
85
86
87
88
89
90
91
92
93
94
95
96
97
98
99
100
101
102
103
104
105
106
107
108
109
110
111
112
113
114
115
116
117
118
119
120
121
122
123
124
125
126
127
128
129
130
131
132
133global:
scrape_interval: 10s
scrape_timeout: 10s
evaluation_interval: 10m
scrape_configs:
- job_name: config_server
#scrape_interval: 5s
#scrape_timeout: 5s
metrics_path: /ops/prometheus
scheme: http
#basic_auth:
# username: admin
# password: 123456
static_configs:
- targets: ['192.168.63.21:8100']
labels:
instance: 192.168.63.21
- targets: ['192.168.64.21:8100']
labels:
instance: 192.168.64.21
- job_name: employee_server
metrics_path: /ops/prometheus
scheme: http
static_configs:
- targets: ['192.168.63.31:8078']
labels:
instance: 192.168.63.31
- targets: ['192.168.64.31:8078']
labels:
instance: 192.168.64.31
- job_name: hkcash_server
metrics_path: /ops/prometheus
scheme: http
static_configs:
- targets: ['192.168.63.21:8085']
labels:
instance: 192.168.63.21
- targets: ['192.168.64.21:8085']
labels:
instance: 192.168.64.21
- job_name: eureka_server
metrics_path: /ops/prometheus
scheme: http
static_configs:
- targets: ['192.168.63.31:8761']
labels:
instance: 192.168.63.31
- targets: ['192.168.64.31:8761']
labels:
instance: 192.168.64.31
- job_name: notify_server
metrics_path: /ops/prometheus
scheme: http
static_configs:
- targets: ['192.168.63.31:8086']
labels:
instance: 192.168.63.31
- targets: ['192.168.64.31:8086']
labels:
instance: 192.168.64.31
- job_name: tu_server
metrics_path: /ops/prometheus
scheme: http
static_configs:
- targets: ['192.168.63.11:45678']
labels:
instance: 192.168.63.11
- targets: ['192.168.64.11:45678']
labels:
instance: 192.168.64.11
- job_name: app_gateway
metrics_path: /ops/prometheus
scheme: http
static_configs:
- targets: ['192.168.63.11:8062']
labels:
instance: 192.168.63.11
- targets: ['192.168.64.11:8062']
labels:
instance: 192.168.64.11
- job_name: lms_webapp
metrics_path: /ops/prometheus
scheme: http
static_configs:
- targets: ['192.168.63.101:8079']
labels:
instance: 192.168.63.101
- job_name: los_webapp
metrics_path: /ops/prometheus
scheme: http
static_configs:
- targets: ['192.168.63.101:8080']
labels:
instance: 192.168.63.101
- job_name: cAdvisor
static_configs:
- targets: ['192.168.63.21:4194']
labels:
container_group: 192.168.63.21
- targets: ['192.168.64.21:4194']
labels:
container_group: 192.168.64.21
- targets: ['192.168.63.31:4194']
labels:
container_group: 192.168.63.31
- targets: ['192.168.64.31:4194']
labels:
container_group: 192.168.64.31
- targets: ['192.168.63.11:4194']
labels:
container_group: 192.168.63.11
- targets: ['192.168.64.11:4194']
labels:
container_group: 192.168.64.11
- targets: ['192.168.63.101:4194']
labels:
container_group: 192.168.63.101
- targets: ['192.168.64.178:4194']
labels:
container_group: 192.168.64.178
- targets: ['192.168.64.179:4194']
labels:
container_group: 192.168.64.179
访问
效果: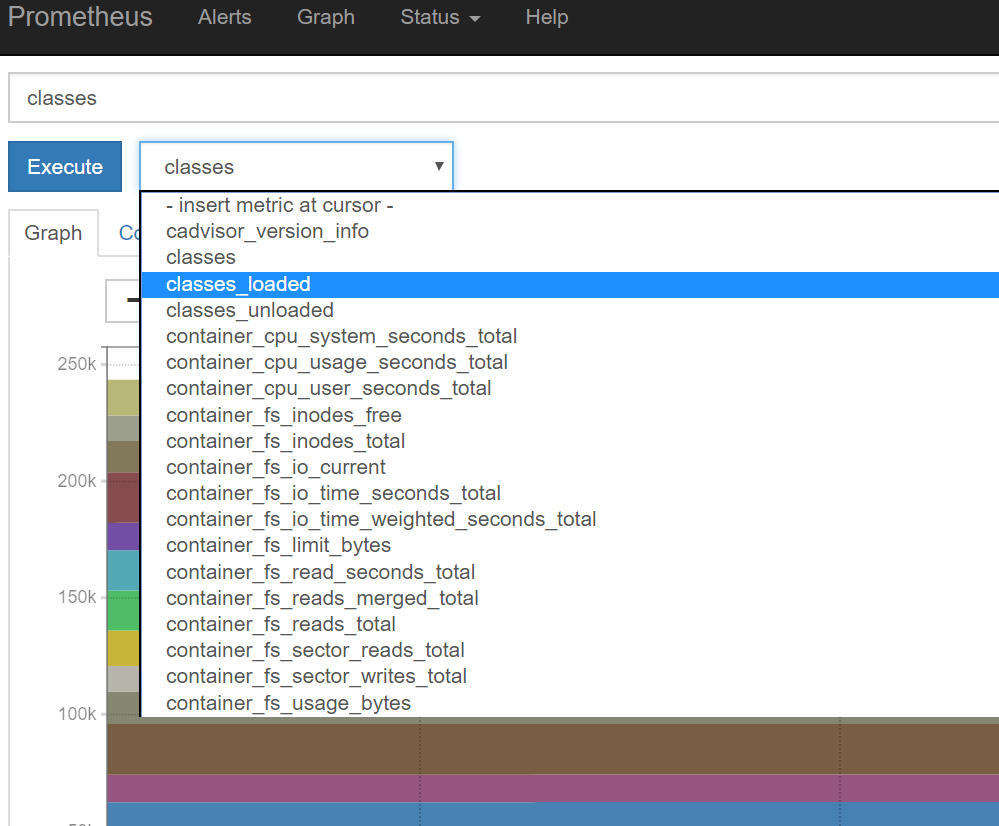
grafna
Grafana 是一个开源的图表可视化系统,简言之,其特点在于图表配置比较方便、生成的图表漂亮。
Prometheus + Grafana 监控系统的组合中,前者负责采样数据并存储这些数据;后者则侧重于形象生动的展示数据。
安装
1 | docker run -d --name grafana -p 3000:3000 grafana/grafana |
访问
默认登录账户密码都为admin
配置
添加数据源
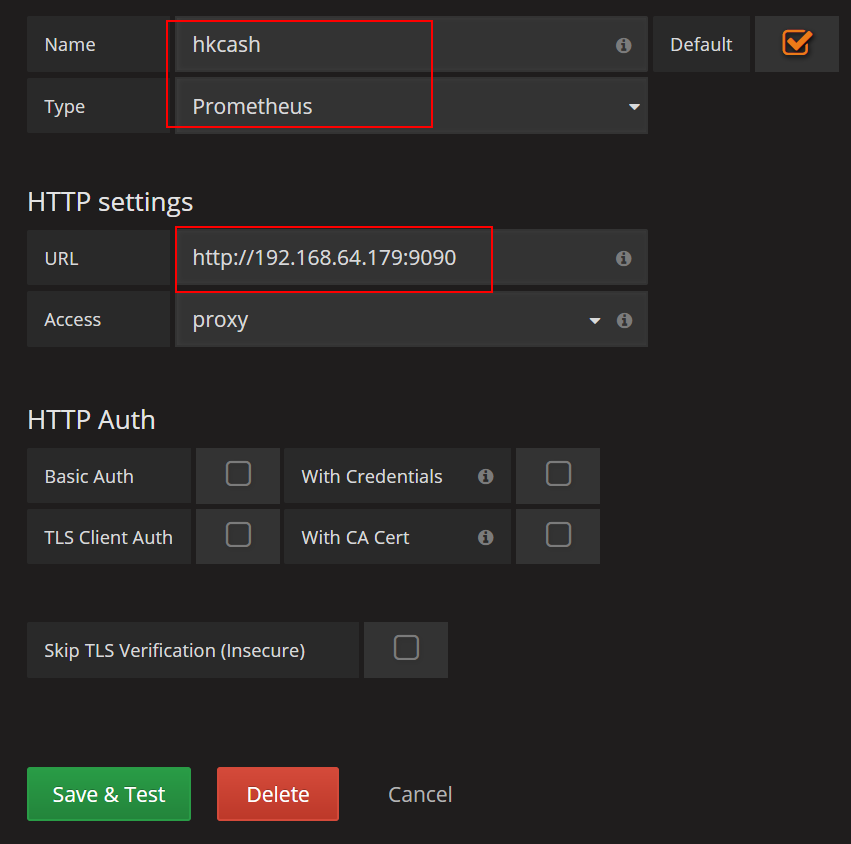
添加Templating

job: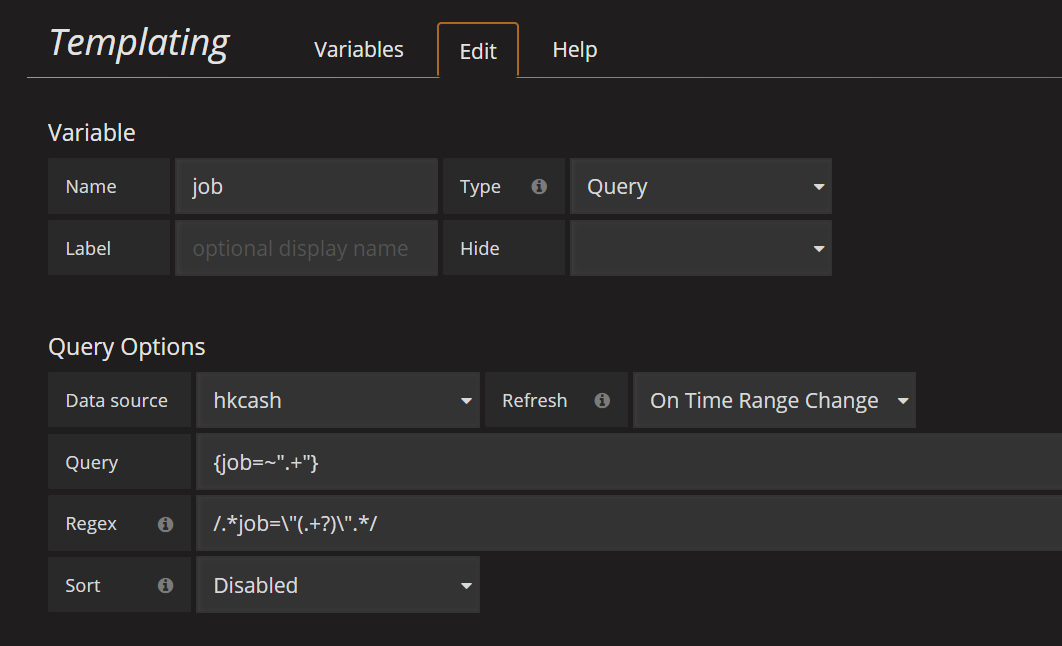
instance: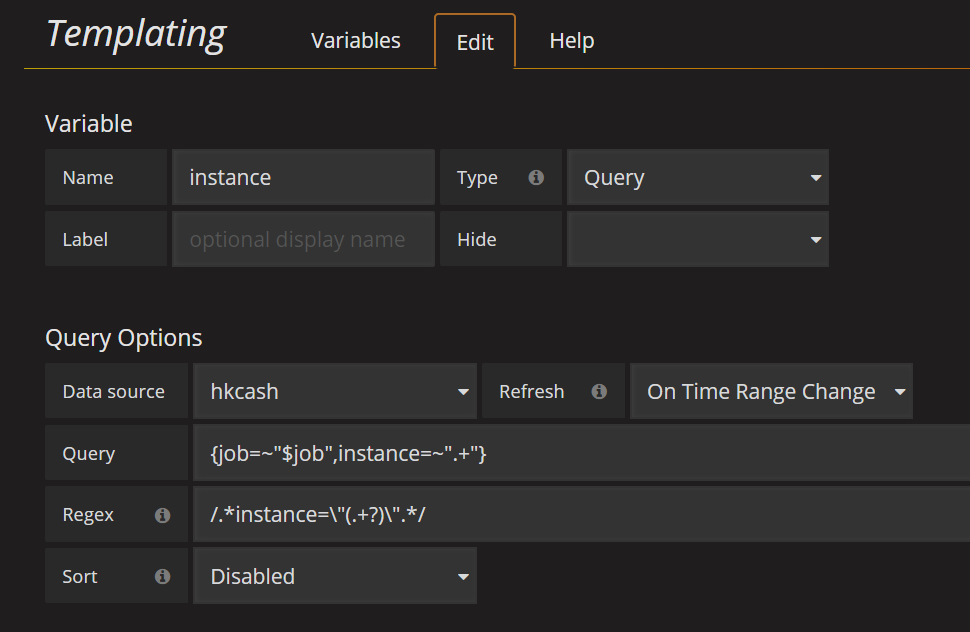
apis: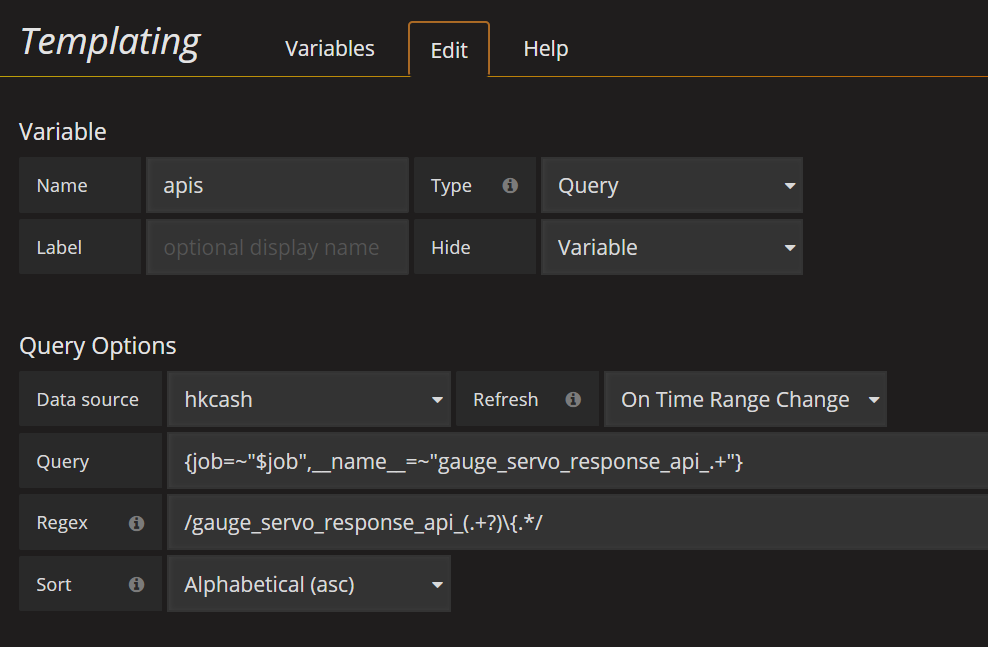
效果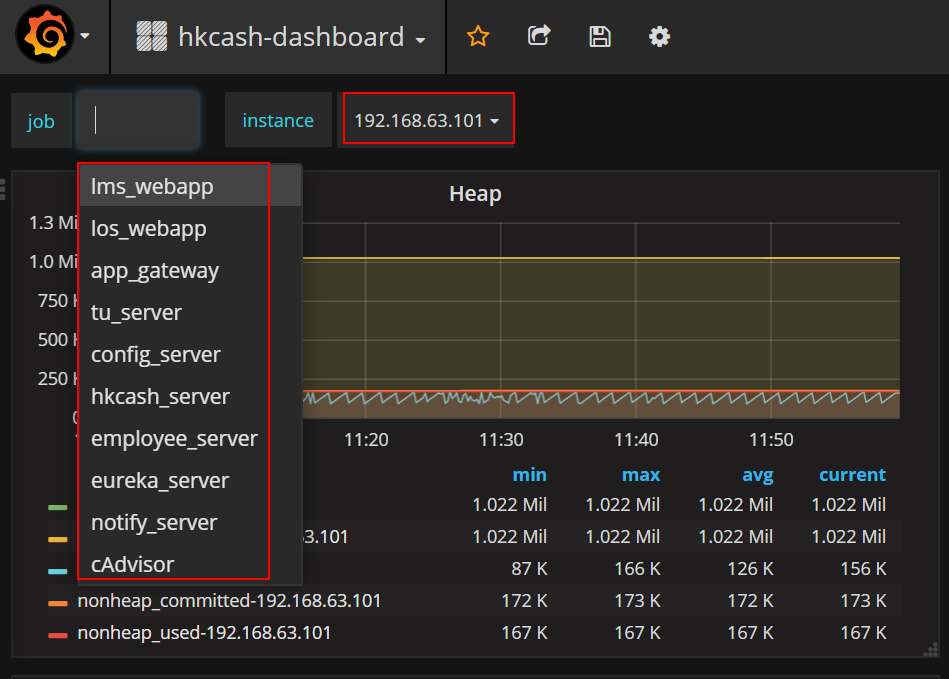
添加panel
mem
1 | mem{job=~"[[job]]",instance=~"[[instance]]"} |
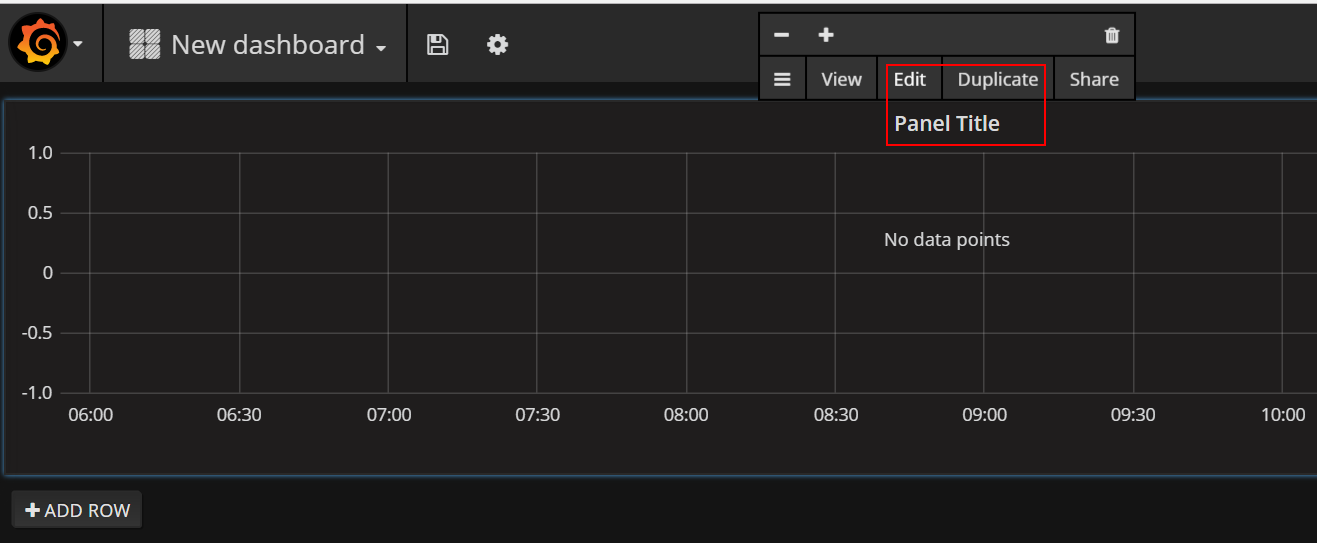
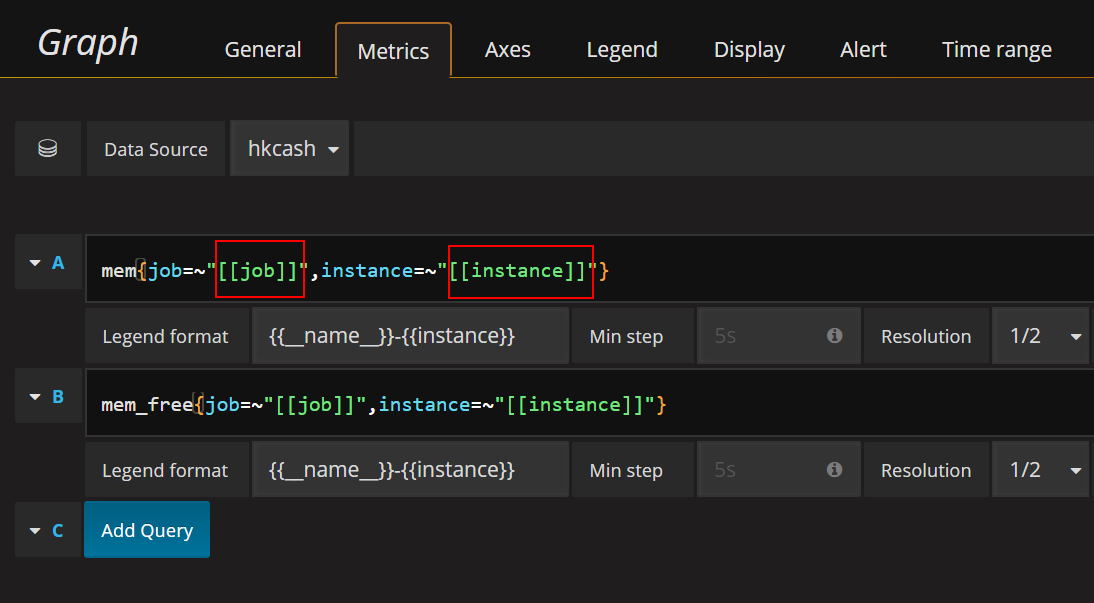
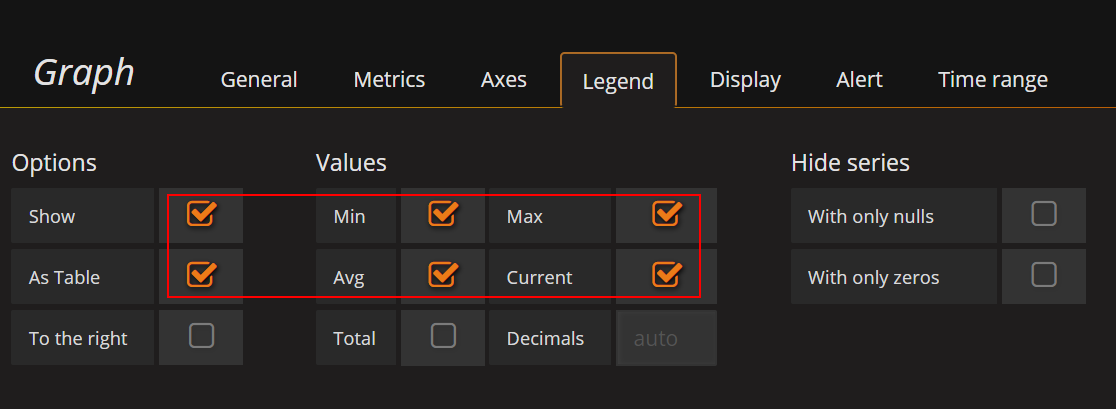

效果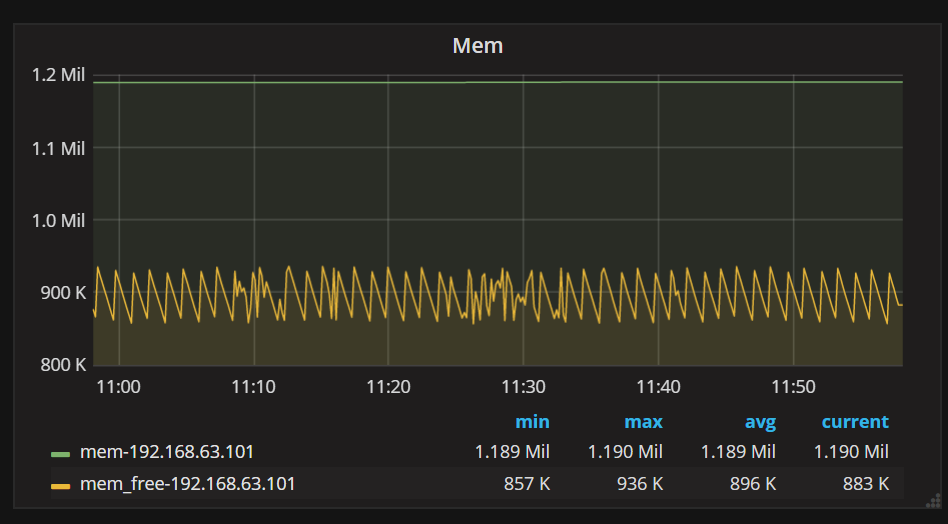
Heap
1 | heap{job=~"[[job]]",instance=~"[[instance]]"} |
Threads
1 | threads{job=~"[[job]]",instance=~"[[instance]]"} |
systemload_average
1 | systemload_average{job=~"[[job]]",instance=~"[[instance]]"} |
Gauge_servo_response_api
1 | {job=~"[[job]]",instance=~"[[instance]]",__name__=~"gauge_servo_response_api_.*"} |
具体的配置文件参考prometheus.json
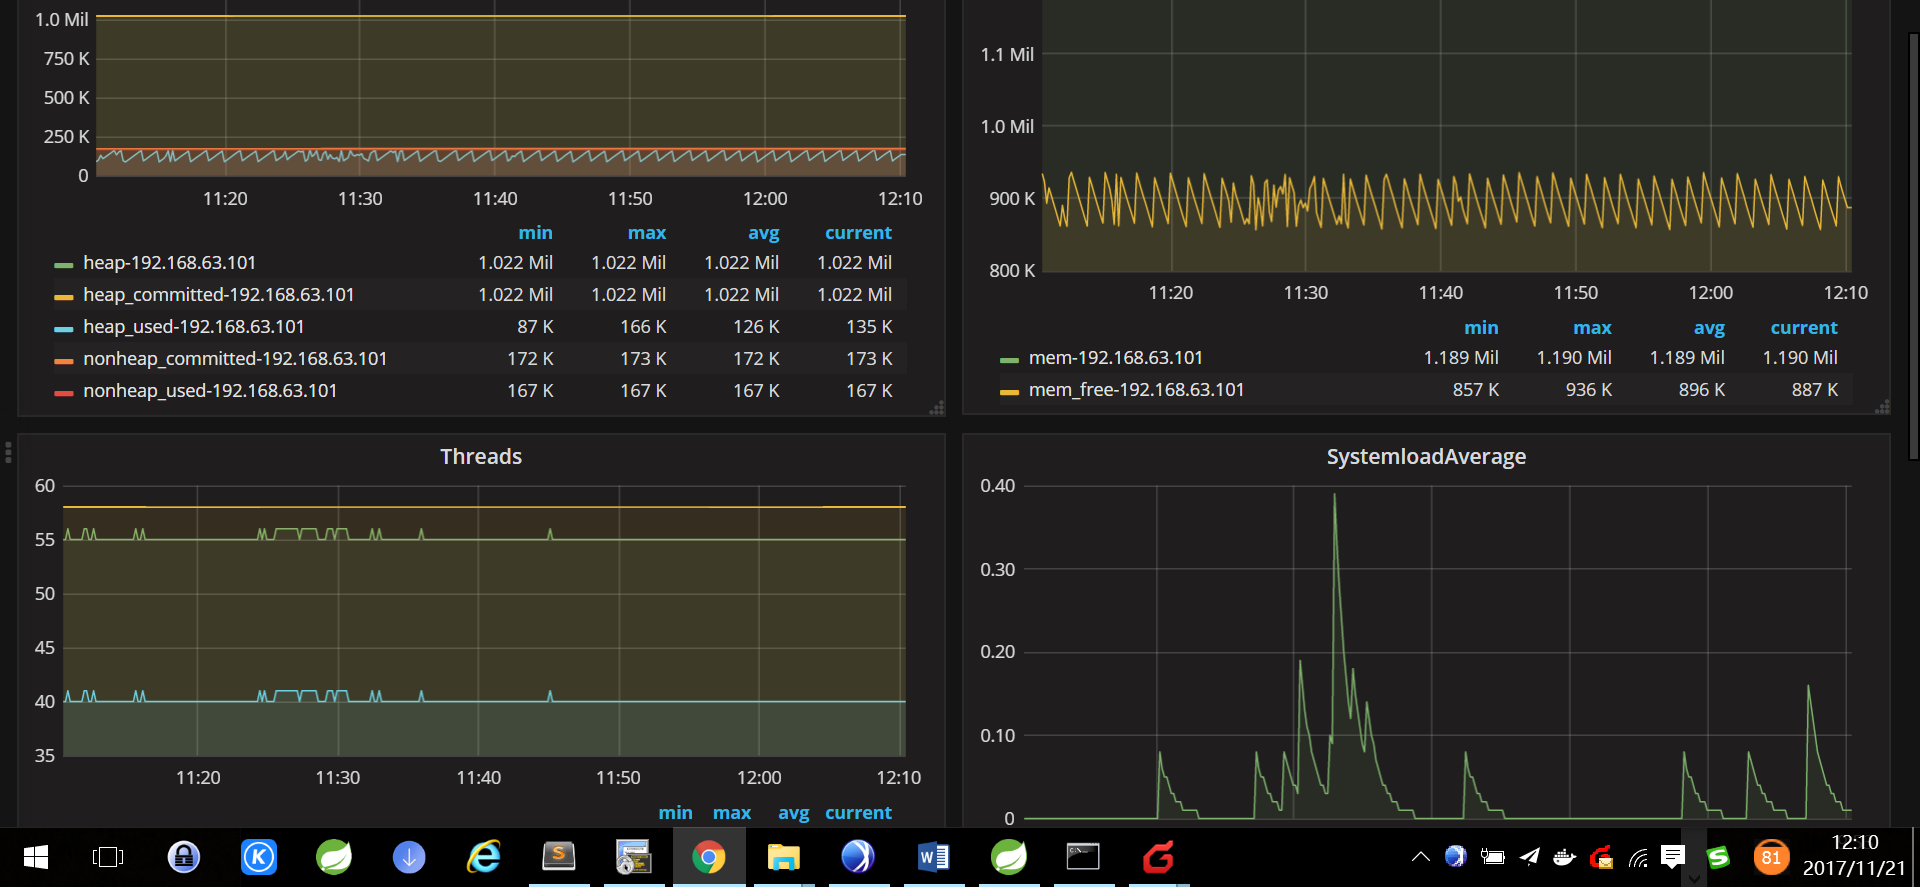
整体效果
容器监控
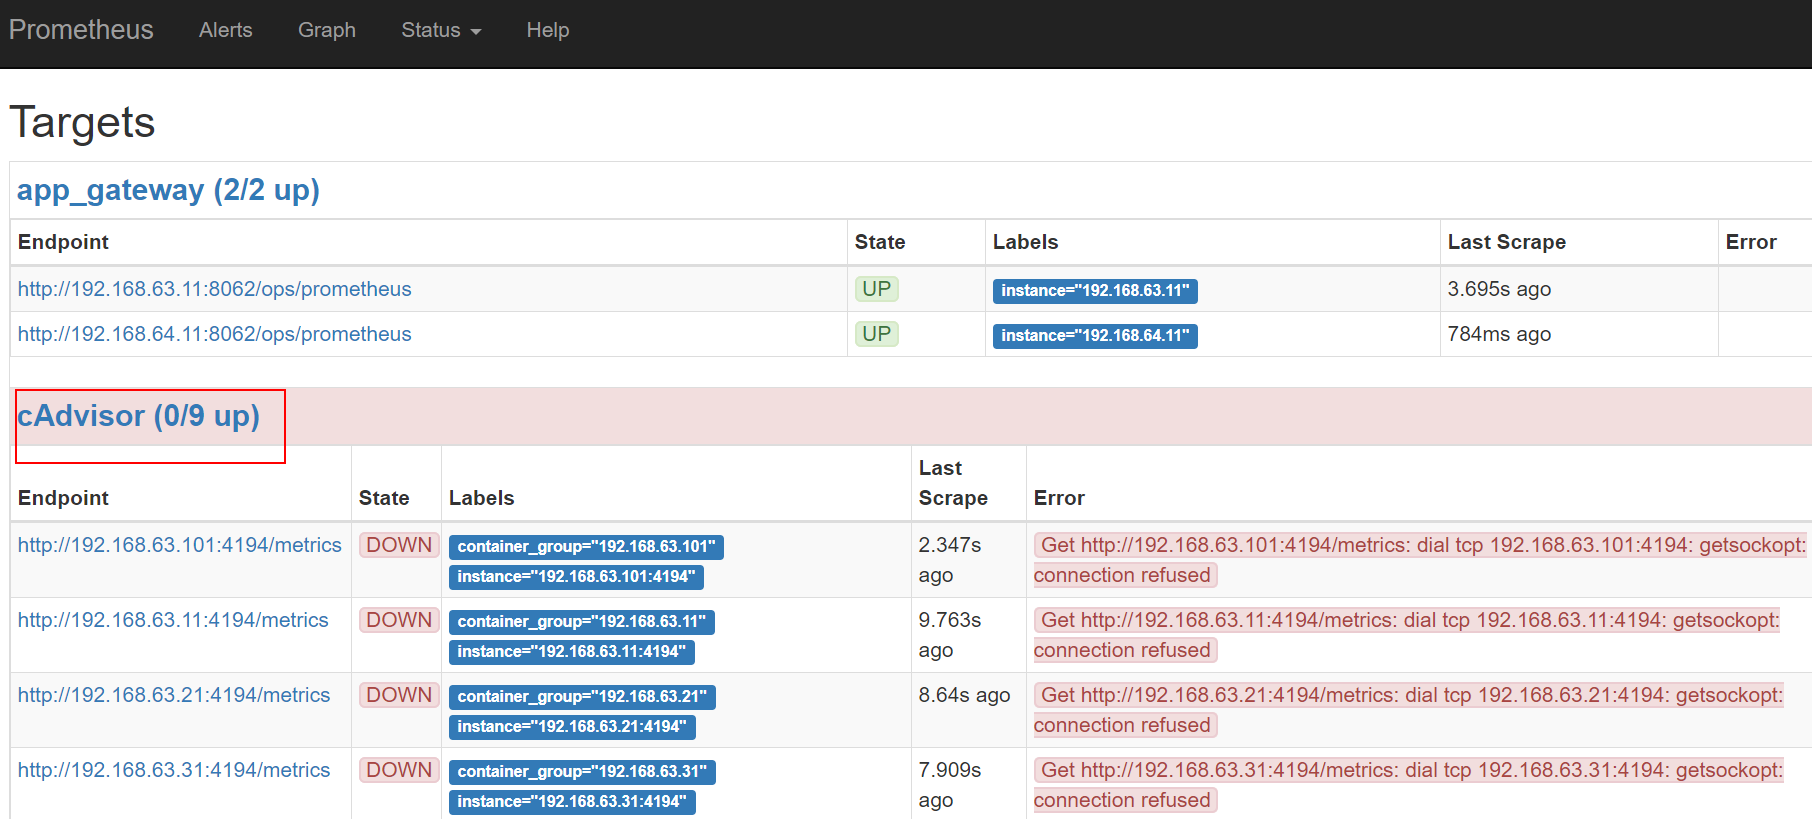
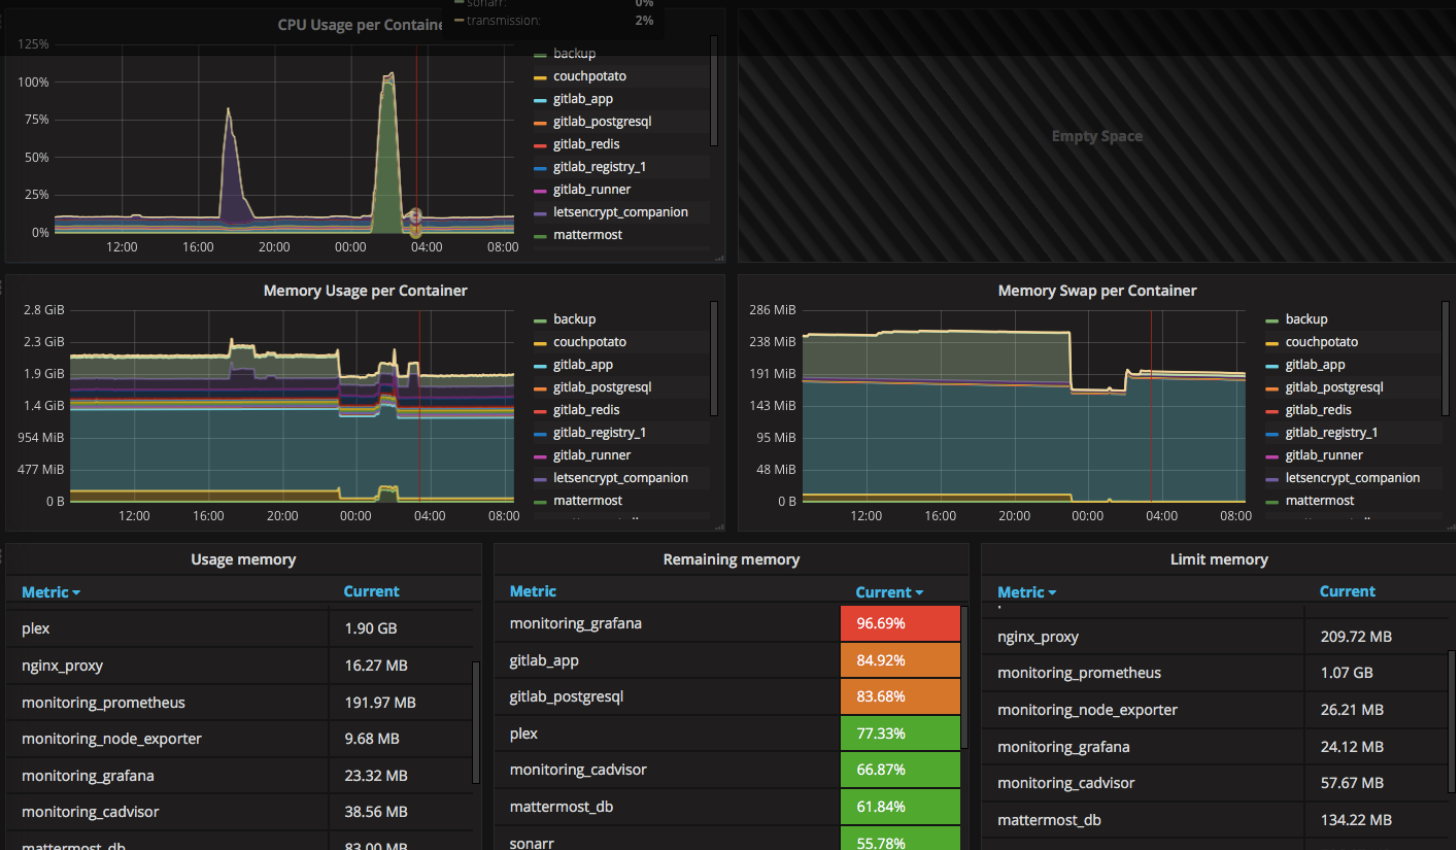
通过cAdvisor收集docker日志,再通过prometheus在grafana中显示。
cAdvisor
每台容器安装:1
2
3
4
5
6
7
8
9
10docker run --restart=always \
--volume=/:/rootfs:ro \
--volume=/var/run:/var/run:rw \
--volume=/sys:/sys:ro \
--volume=/var/lib/docker/:/var/lib/docker:ro \
--volume=/dev/disk/:/dev/disk:ro \
--publish=4194:8080 \
--detach=true \
--name=cadvisor \
google/cadvisor:latest
prometheus配置
1 | ... |
grafana dashboard
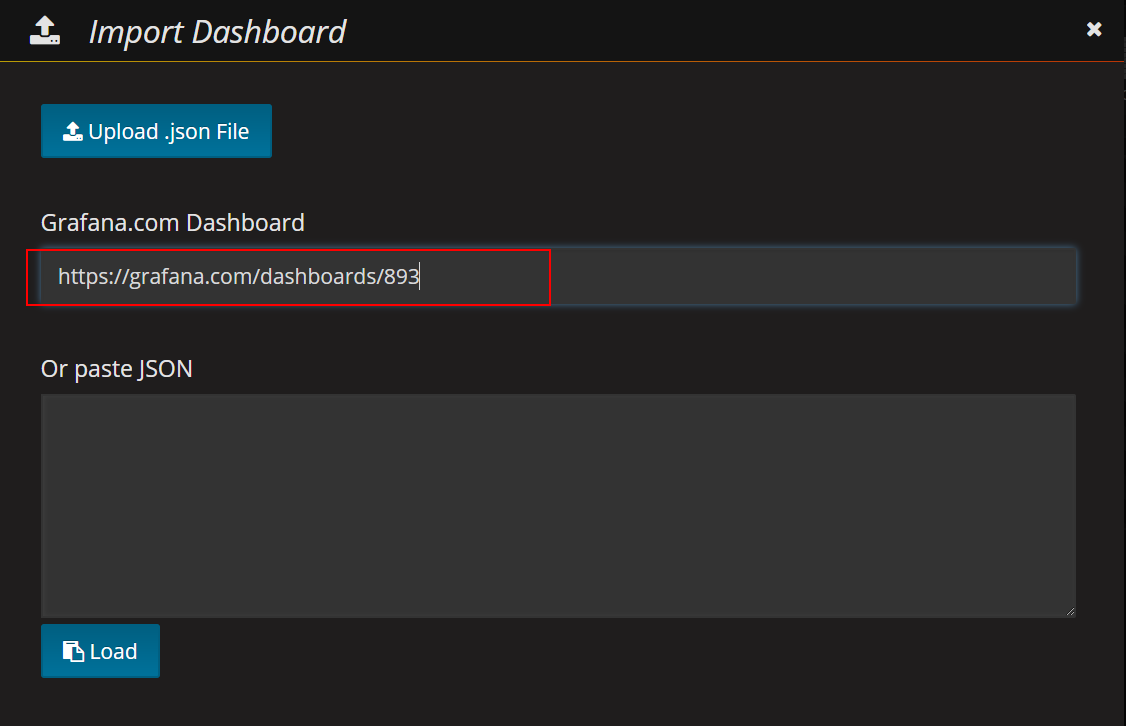
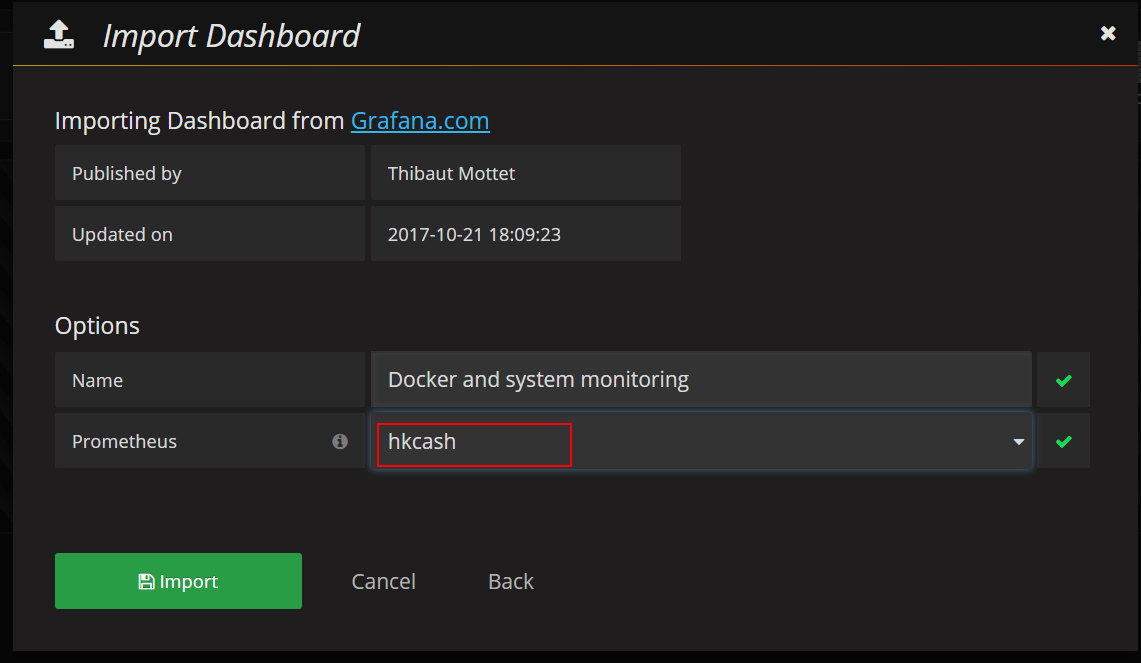
可以从grafana官网导入dashboard:https://grafana.com/dashboards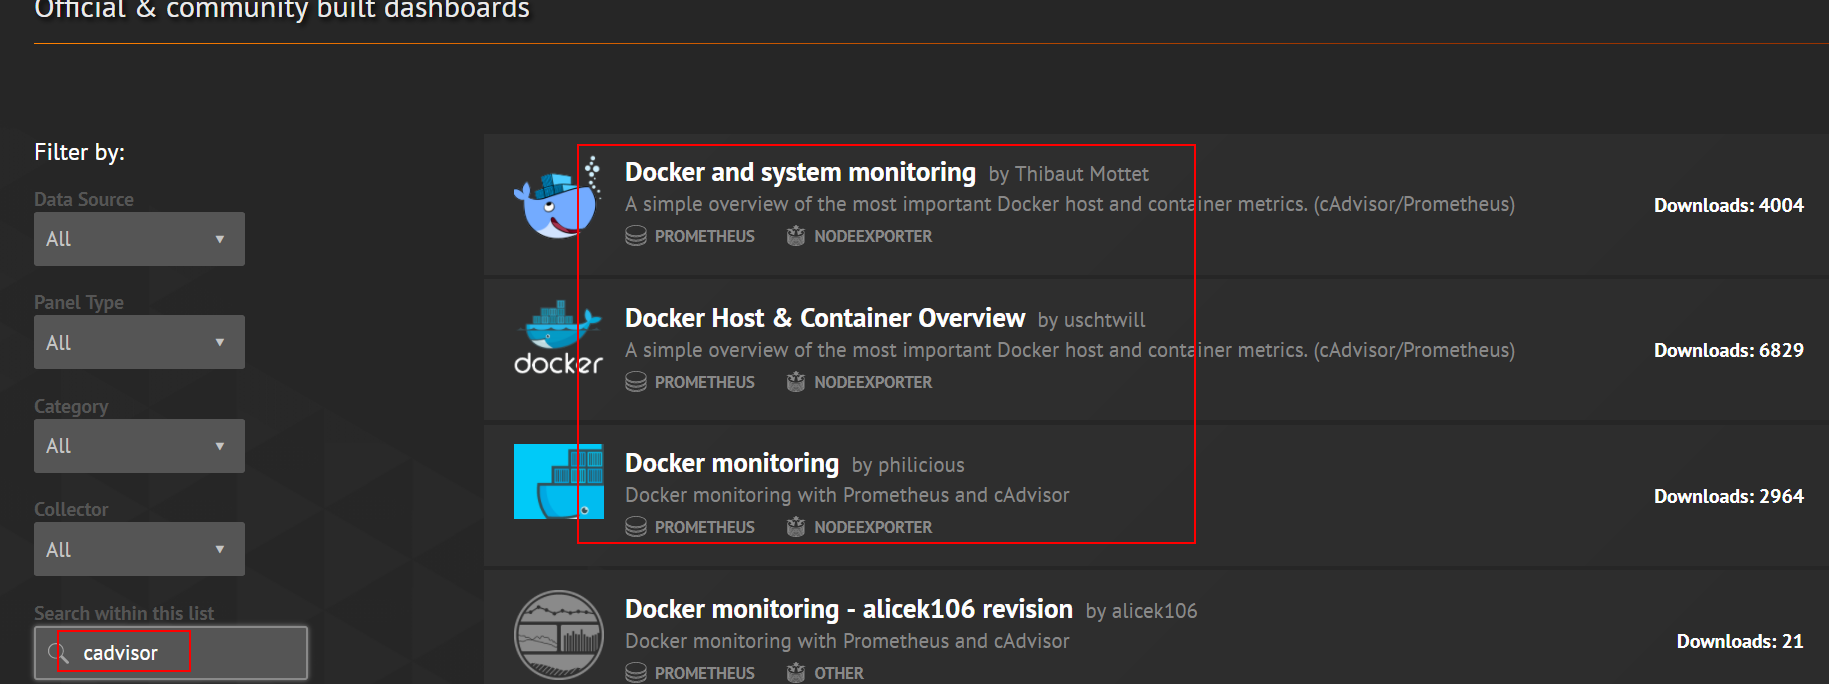
导入dashboard: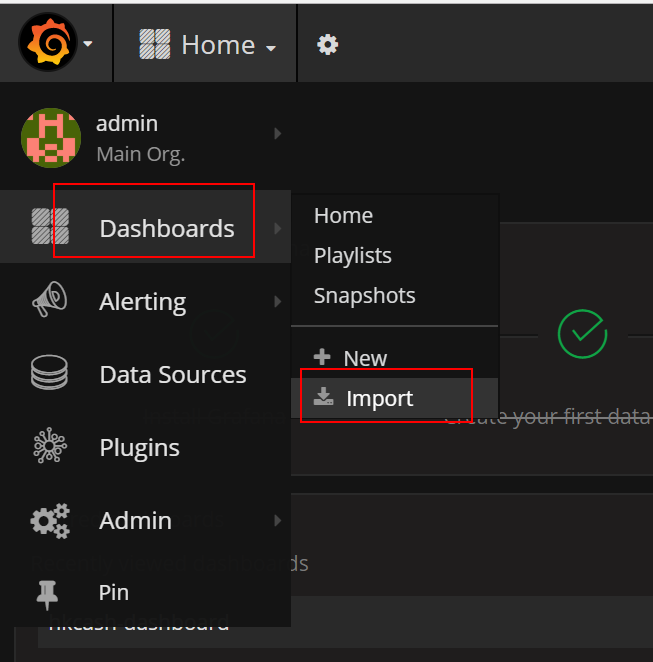
效果
hystrix-dashboard
hystrix
hystrix旨在通过控制那些访问远程系统、服务和第三方库的节点,从而对延迟和故障提供更强大的容错能力。Hystrix具备拥有回退机制和断路器功能的线程和信号隔离,请求缓存和请求打包(request collapsing,即自动批处理),以及监控和配置等功能。
添加依赖:1
2
3
4
5
6
7
8
9<!-- /hystrix.stream需要用到spring-boot-starter-actuator -->
<dependency>
    <groupId>org.springframework.boot</groupId>
    <artifactId>spring-boot-starter-actuator</artifactId>
</dependency>
<dependency>
<groupId>org.springframework.cloud</groupId>
<artifactId>spring-cloud-starter-hystrix</artifactId>
</dependency>
启动类中添加:1
2
3
dashboard
Hystrix-dashboard是一款针对Hystrix进行实时监控的工具,通过Hystrix Dashboard我们可以在直观地看到各Hystrix Command的请求响应时间, 请求成功率等数据。
添加依赖:1
2
3
4
5
6
7
8
9
10
11
12
13
14<dependency>
<groupId>org.springframework.boot</groupId>
<artifactId>spring-boot-starter-actuator</artifactId>
</dependency>
<dependency>
<groupId>org.springframework.cloud</groupId>
<artifactId>spring-cloud-starter-hystrix-dashboard</artifactId>
</dependency>
<dependency>
<groupId>org.springframework.cloud</groupId>
<artifactId>spring-cloud-starter-eureka</artifactId>
</dependency>
turbine
但是只使用Hystrix Dashboard的话, 你只能看到单个应用内的服务信息, 这明显不够. 我们需要一个工具能让我们汇总系统内多个服务的数据并显示到Hystrix Dashboard上, 这个工具就是Turbine.
添加依赖:1
2
3
4<dependency>
<groupId>org.springframework.cloud</groupId>
<artifactId>spring-cloud-netflix-turbine</artifactId>
</dependency>
启动类添加:1
2
3
4
配置
1 | server: |
效果: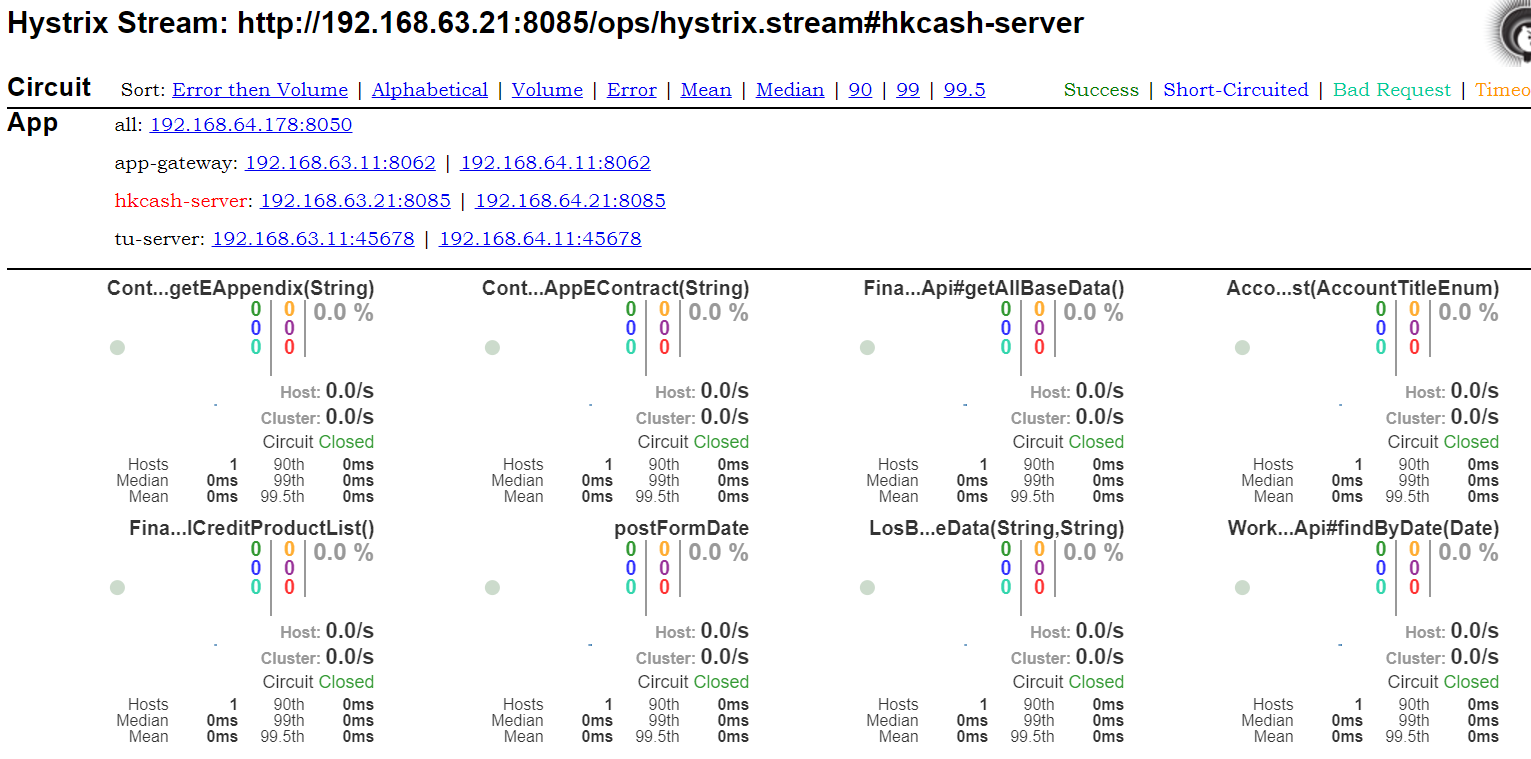
sleuth zipkin
spring cloud sleuth是从google的dapper论文的思想实现的,提供了对spring cloud系列的链路追踪。
目的:
提供链路追踪。通过sleuth可以很清楚的看出一个请求都经过了哪些服务。可以很方便的理清服务间的调用关系。
可视化错误。对于程序未捕捉的异常,可以在zipkin界面上看到。
分析耗时。通过sleuth可以很方便的看出每个采样请求的耗时,分析出哪些服务调用比较耗时。当服务调用的耗时随着请求量的增大而增大时,也可以对服务的扩容提供一定的提醒作用。
优化链路。对于频繁地调用一个服务,或者并行地调用等,可以针对业务做一些优化措施。
应用程序集成
sleuth+log
添加依赖:1
2
3
4<dependency>
<groupId>org.springframework.cloud</groupId>
<artifactId>spring-cloud-starter-sleuth</artifactId>
</dependency>
这种方式只需要引入jar包即可。如果配置log4j,这样会在打印出如下的日志:1
22017-04-08 23:56:50.459 INFO [bootstrap,38d6049ff0686023,d1b8b0352d3f6fa9,false] 8764 — [nio-8080-exec-1] demo.JpaSingleDatasourceApplication : Step 2: Handling print
2017-04-08 23:56:50.459 INFO [bootstrap,38d6049ff0686023,d1b8b0352d3f6fa9,false] 8764 — [nio-8080-exec-1] demo.JpaSingleDatasourceApplication : Step 1: Handling home
比原先的日志多出了 [bootstrap,38d6049ff0686023,d1b8b0352d3f6fa9,false] 这些内容,[appname,traceId,spanId,exportable]。
appname:服务名称
traceId\spanId:链路追踪的两个术语,后面有介绍
exportable:是否是发送给zipkin
sleuth+zipkin+http
sleuth收集跟踪信息通过http请求发给zipkin。这种需要启动一个zipkin,zipkin用来存储数据和展示数据。
添加依赖:1
2
3
4
5
6
7
8<!--<dependency>
<groupId>org.springframework.cloud</groupId>
<artifactId>spring-cloud-starter-sleuth</artifactId>
</dependency>-->
<dependency>
<groupId>org.springframework.cloud</groupId>
<artifactId>spring-cloud-starter-zipkin</artifactId>
</dependency>
配置:1
2
3
4
5
6
7spring:
sleuth:
sampler:
percentage: 1.0
zipkin:
enabled: true
base-url: http://localhost:9411/
sletuh+streaming+zipkin
这种方式通过spring cloud streaming将追踪信息发送到zipkin。spring cloud streaming目前只有kafka和rabbitmq的binder。以rabbitmq为例:
添加依赖:1
2
3
4
5
6
7
8<dependency>
<groupId>org.springframework.cloud</groupId>
<artifactId>spring-cloud-sleuth-stream</artifactId>
</dependency>
<dependency>
<groupId>org.springframework.cloud</groupId>
<artifactId>spring-cloud-starter-stream-rabbit</artifactId>
</dependency>
配置:1
2
3
4
5
6
7
8
9
10
11
12
13spring:
sleuth:
stream:
enabled: true
sampler:
percentage: 1
#for sleuth
rabbitmq:
host: 192.168.99.100
port: 5672
username: guest
password: guest
# virtual-host: cloud_host
zipkin-server
Zipkin 是 Twitter 的一个开源项目,允许开发者收集Twitter各个服务上的监控数据,并提供查询接口。
安装
zipkin-server采用spring方式安装:
http方式
添加依赖:1
2
3
4
5
6
7
8
9<dependency>
<groupId>io.zipkin.java</groupId>
<artifactId>zipkin-server</artifactId>
</dependency>
<dependency>
<groupId>io.zipkin.java</groupId>
<artifactId>zipkin-autoconfigure-ui</artifactId>
<scope>runtime</scope>
</dependency>
启动类添加:1
2
stream方式
添加依赖:1
2
3
4
5
6
7
8
9
10
11
12
13<dependency>
<groupId>org.springframework.cloud</groupId>
<artifactId>spring-cloud-sleuth-zipkin-stream</artifactId>
</dependency>
<dependency>
<groupId>org.springframework.cloud</groupId>
<artifactId>spring-cloud-starter-stream-rabbit</artifactId>
</dependency>
<dependency>
<groupId>io.zipkin.java</groupId>
<artifactId>zipkin-autoconfigure-ui</artifactId>
<scope>runtime</scope>
</dependency>
启动类添加:1
2
配置:1
2
3
4
5
6
7spring:
#@EnableZipkinStreamServer时使用
rabbitmq:
host: 192.168.100.88
port: 5672
username: guest
password: guest
elasticsearch安装
如果容器内部通讯没有打通的话,需要采用以下方式部署:1
2
3
4
5
6
7
8
9
10
11
12
13
14
15
16
17tee elasticsearch.yml << EOF
network.host: 192.168.64.179
discovery.zen.minimum_master_nodes: 1
EOF
docker run --privileged=true --net=host -d -h elasticsearch --restart=always --name elasticsearch \
-p 9200:9200 -p 9300:9300 \
-e "ES_JAVA_OPTS=-Xms512m -Xmx512m" \
-v "$PWD/elasticsearch.yml:/usr/share/elasticsearch/config/elasticsearch.yml" \
elasticsearch:2.4.4
如果想将存储指到容器外,可以映射:
#-v "$PWD/config":/usr/share/elasticsearch/config \
#-v "$PWD/esdata":/usr/share/elasticsearch/data \
#index
curl http://192.168.99.100:9200/_cat/indices?v
如果有打通容器内部通讯或者与zipkin-server部署在同一台机器上,则安装比较简单:
1 | docker run -d -h elasticsearch --restart=always --name elasticsearch \ |
rabbitmq
日志采集是通过sleuth-zipkin-stream方式收集的,此处采用rabbitmq。可以采用docker方式安装:
1 | docker run -d -h rabbitmq --restart=always --name rabbitmq -p 5672:5672 -p 15672:15672 \ |
数据存储
Mem
内存方式,只适合于测试环境:
配置:1
2
3zipkin:
storage:
type: mem
MySQL
添加依赖:1
2
3
4
5
6
7
8
9
10
11
12<dependency>
<groupId>io.zipkin.java</groupId>
<artifactId>zipkin-autoconfigure-storage-mysql</artifactId>
</dependency>
<dependency>
<groupId>mysql</groupId>
<artifactId>mysql-connector-java</artifactId>
</dependency>
<dependency>
<groupId>org.springframework.boot</groupId>
<artifactId>spring-boot-starter-jdbc</artifactId>
</dependency>
配置:1
2
3
4
5
6
7
8
9
10
11
12
13
14
15
16spring:
application:
name: zipkin-server
datasource:
url: jdbc:mysql://192.168.100.88:3308/zipkin?autoReconnect=true
username: root
password: helloworld
driver-class-name: com.mysql.jdbc.Driver
# schema: classpath:/mysql.sql
# initialize: true
# continue-on-error: true
zipkin:
storage:
type: mysql
Elasticsearch
添加依赖:1
2
3
4
5
6
7
8
9<dependency>
<groupId>io.zipkin.java</groupId>
<artifactId>zipkin-autoconfigure-storage-elasticsearch</artifactId>
<version>1.19.2</version>
</dependency>
<dependency>
<groupId>org.elasticsearch</groupId>
<artifactId>elasticsearch</artifactId>
</dependency>
配置:1
2
3
4
5
6
7
8
9zipkin:
storage:
type: elasticsearch
elasticsearch:
cluster: elasticsearch
hosts: 192.168.108.183:9300
index: zipkin
# index-shards: ${ES_INDEX_SHARDS:5}
# index-replicas: ${ES_INDEX_REPLICAS:1}
zipkin-dependencies
如果为非mem方式部署的zipkin-server,zipkin-dependencies是没有数据的,需要加入zipkin-dependencies模块才能正常显示。以elasticsearch为例:
添加依赖:1
2
3
4
5<dependency>
<groupId>io.zipkin.dependencies</groupId>
<artifactId>zipkin-dependencies-elasticsearch</artifactId>
<version>1.5.4</version>
</dependency>
添加代码:1
2
3
4
5
6
7
8
9
10
11
12
13
14
15
16
17
18
19
20
21
public class ElasticsearchDependenciesTask {
private Logger logger = LoggerFactory.getLogger(this.getClass());
("${spark.es.nodes}")
private String esNodes;
("${spark.driver.allowMultipleContexts}")
private String allowMultipleContexts;
(cron = "0 */5 * * * ?")
public void run() throws Exception {
// -e ES_HOSTS="192.168.108.183:9200"
Map<String, String> envs = Maps.newHashMap();
envs.put("spark.driver.allowMultipleContexts",allowMultipleContexts);
envs.put("ES_HOSTS",esNodes);
EnvUtils.setEnv(envs);
ElasticsearchDependenciesJob.builder().build().run();
}
}
配置:1
2
3
4
5
6# dependencies-elasticsearch配置
spark:
driver:
allowMultipleContexts: true
es:
nodes: 192.168.108.183:9200
内部是通过spark进行数据分析,再生成对应的dependencies数据。
当然也可以通过docker部署:1
2
3
4
5docker run --rm --name zipkin-dependencies \
-e STORAGE_TYPE=elasticsearch \
-e ES_HOSTS=192.168.108.183:9200 \
-e "JAVA_OPTS=-Xms128m -Xmx128m" \
openzipkin/zipkin-dependencies:1.5.4
这个只会运行一次后退出,如果需要定时执行的话,需要加入到cron中。
效果


可能sleuth收集了很多你不想要的接口请求,可能通过以下配置排除掉:1
2
3
4
5
6
7spring:
sleuth:
web:
skip-pattern: /js/.*|/css/.*|/html/.*|/htm/.*|/static/.*|/ops/.*|/api-docs.*|/swagger.*|.*\.png|.*\.gif|.*\.css|.*\.js|.*\.html|/favicon.ico|/myhealth
scheduled:
enabled: false
#skip-pattern: .*RedisOperationsSessionRepository
jaeger
zipkin的效果不太好,可以考虑使用jaeger,由Uber开源。Jaeger兼容OpenTracing的数据模型和instrumentation库,能够为每个服务/端点使用一致的采样方式。
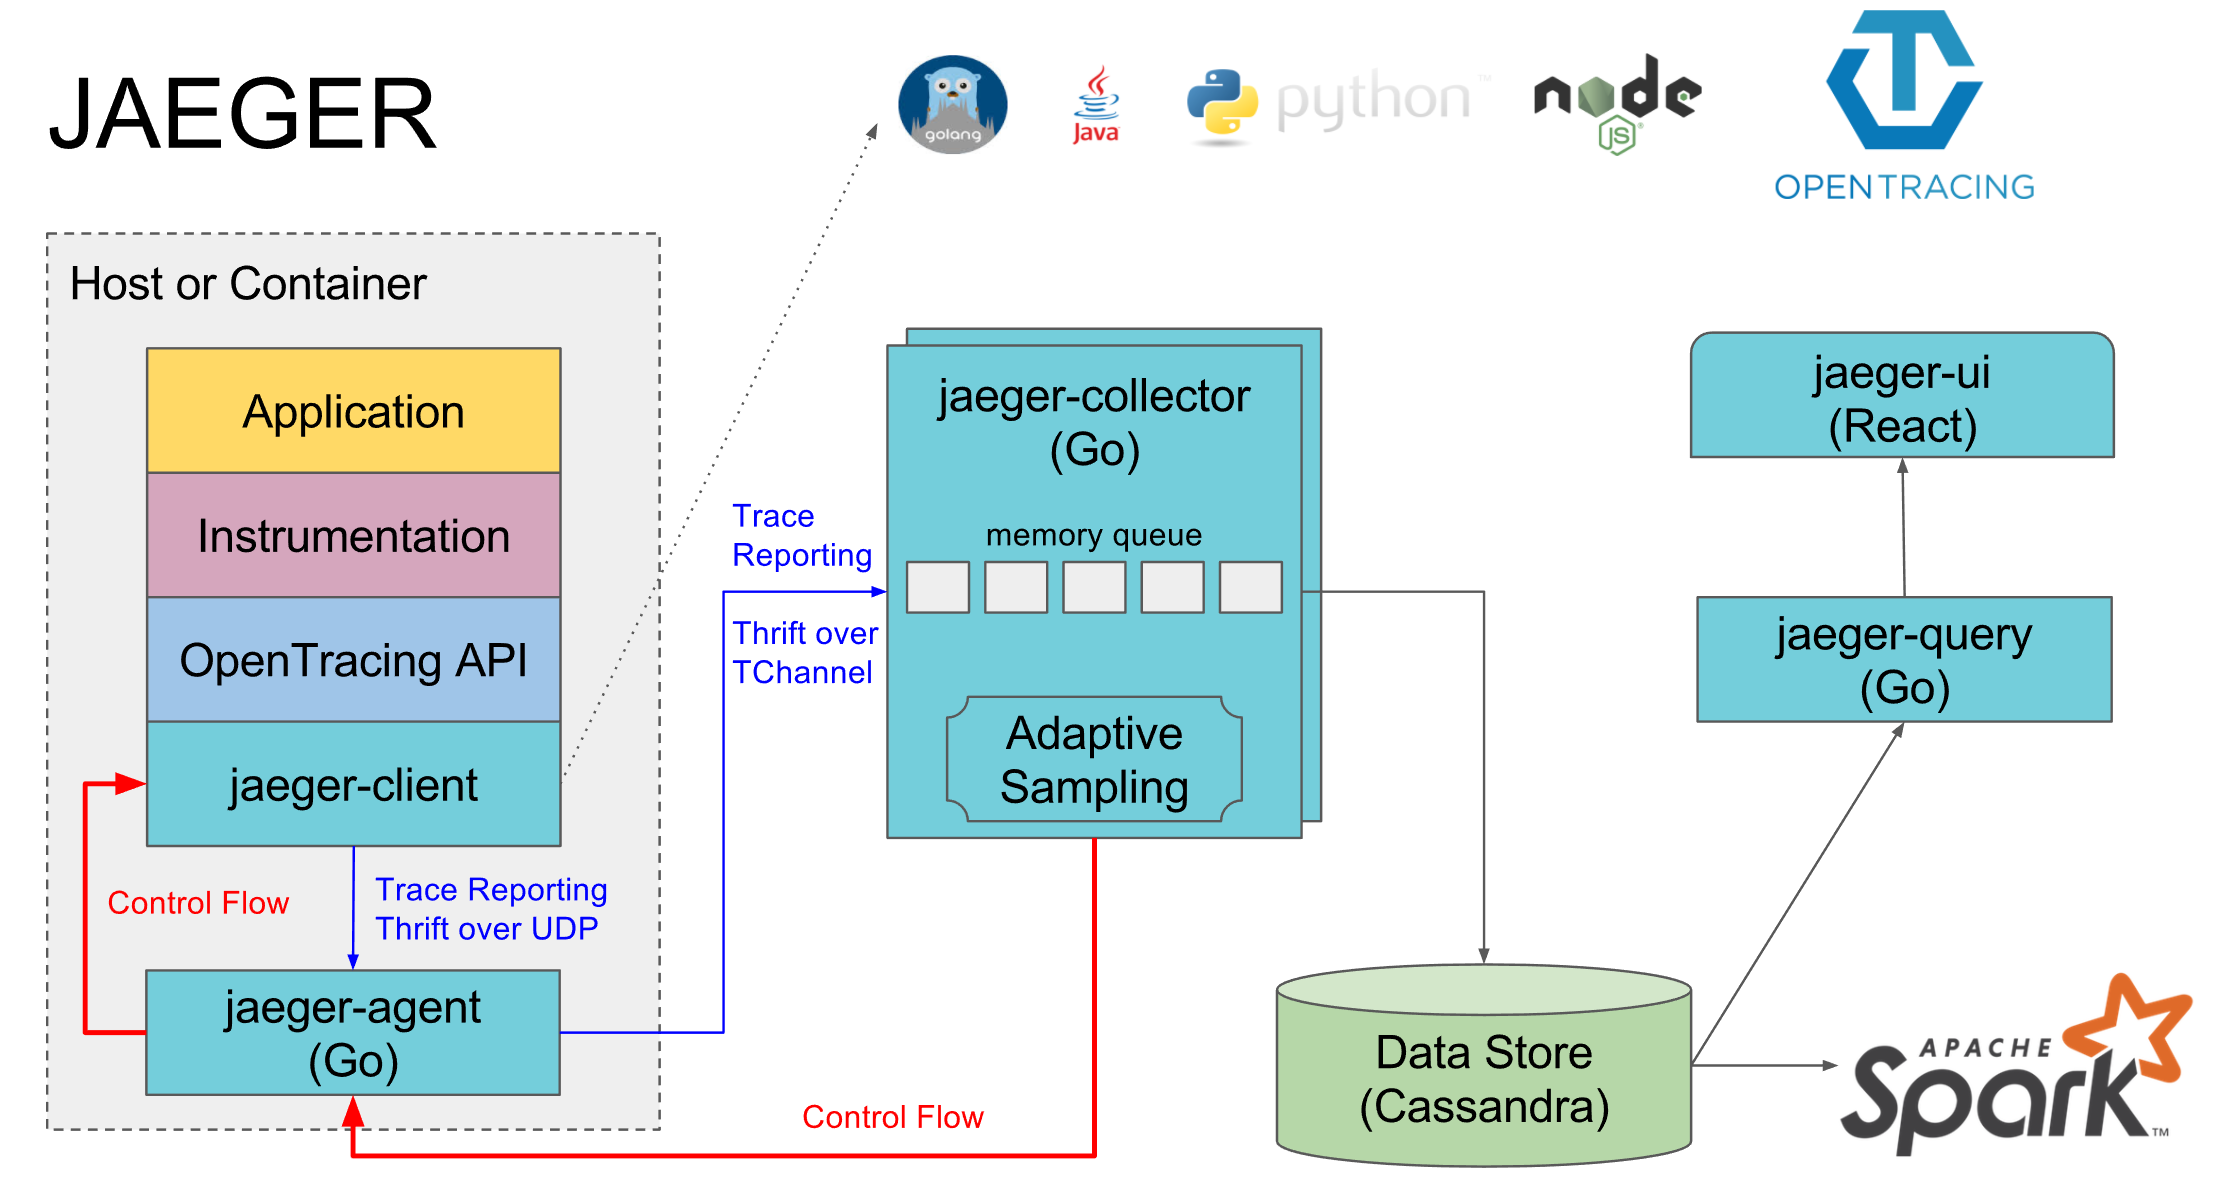
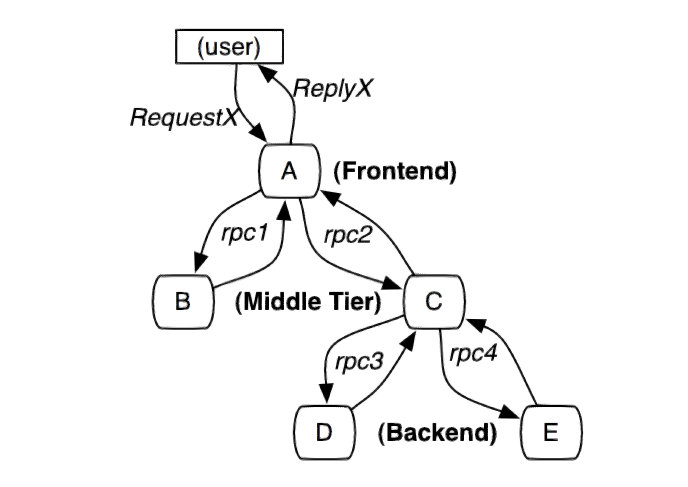
分布式系统调用过程:
opentracing 协议
opentracing是一套分布式追踪协议,与平台,语言无关,统一接口,方便开发接入不同的分布式追踪系统。
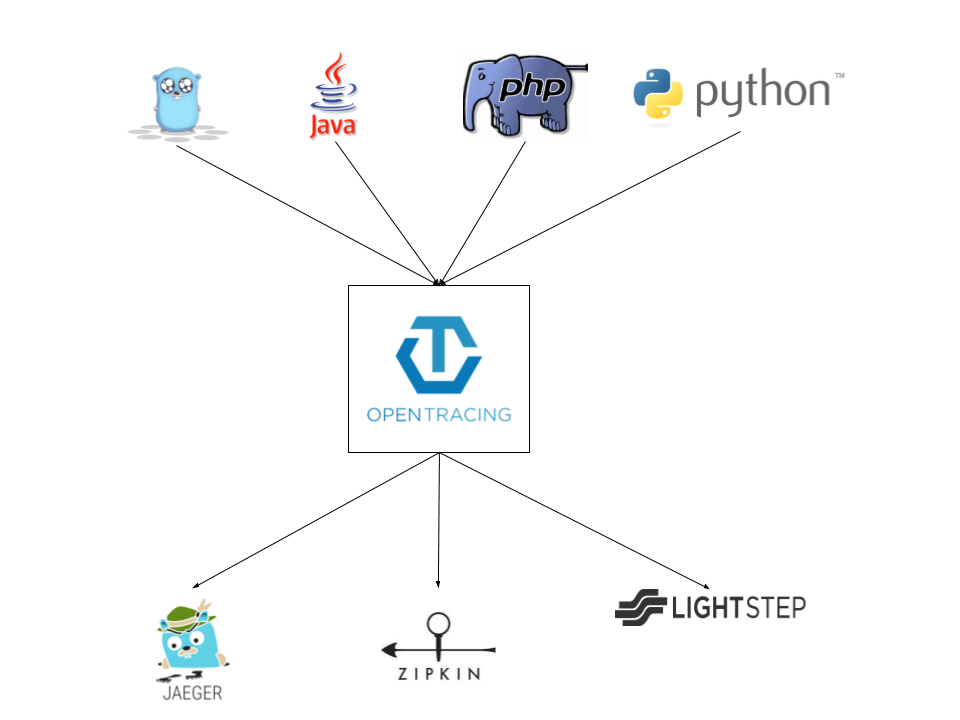
简单理解opentracing:
一个完整的opentracing调用链包含 Trace + span + 无限极分类:
Trace:追踪对象,一个Trace代表了一个服务或者流程在系统中的执行过程,如:test.com,redis,mysql等执行过程。一个Trace由多个span组成
span:记录Trace在执行过程中的信息,如:查询的sql,请求的HTTP地址,RPC调用,开始、结束、间隔时间等。
无限极分类:服务与服务之间使用无限极分类的方式,通过HTTP头部或者请求地址传输到最低层,从而把整个调用链串起来。
安装
可以通过docker-compose安装,请参考docker-compose1
2
3
4
5
6
7
8
9
10
11
12
13
14
15
16
17
18
19
20
21
22
23
24
25
26
27
28
29
30
31
32
33
34
35
36
37
38
39
40
41
42
43
44
45
46
47
48
49
50
51
52
53
54
55
56
57
58
59
60
61
62
63
64
65
66
67
68
69
70
71
72
73
74
75
76
77
78
79
80
81
82
83
84---
version: '2'
services:
els:
image: docker.elastic.co/elasticsearch/elasticsearch:6.0.0
restart: always
container_name: els
hostname: els
networks:
- elastic-jaeger
environment:
#- bootstrap.memory_lock=true
- ES_JAVA_OPTS=-Xms512m -Xmx512m
ports:
- "9200:9200"
- "9300:9300"
volumes:
- ./config/elasticsearch.yml:/usr/share/elasticsearch/config/elasticsearch.yml
kibana:
image: docker.elastic.co/kibana/kibana:6.0.0
ports:
- "5601:5601"
environment:
ELASTICSEARCH_URL: http://els:9200
depends_on:
- els
networks:
- elastic-jaeger
jaeger-collector:
environment:
- SPAN_STORAGE_TYPE=elasticsearch
image: jaegertracing/jaeger-collector:latest
ports:
- "14267:14267"
- "14268:14268"
- "9411:9411"
depends_on:
- els
container_name: jaeger-collector
hostname: jaeger-collector
restart: unless-stopped
networks:
- elastic-jaeger
command: ["/go/bin/collector-linux", "--span-storage.type=elasticsearch", "--es.server-urls=http://els:9200"]
jaeger-agent:
image: jaegertracing/jaeger-agent:latest
ports:
- "5775:5775/udp"
- "5778:5778"
- "6831:6831/udp"
- "6832:6832/udp"
depends_on:
- els
- jaeger-collector
restart: unless-stopped
container_name: jaeger-agent
hostname: jaeger-agent
networks:
- elastic-jaeger
command: ["/go/bin/agent-linux", "--collector.host-port=jaeger-collector:14267"]
jaeger-query:
environment:
- SPAN_STORAGE_TYPE=elasticsearch
image: jaegertracing/jaeger-query:latest
ports:
- 16686:16686
depends_on:
- els
- jaeger-collector
restart: unless-stopped
container_name: jaeger-query
hostname: jaeger-query
networks:
- elastic-jaeger
command: ["/go/bin/query-linux", "--span-storage.type=elasticsearch", "--es.server-urls=http://els:9200", "--es.sniffer=false", "--query.static-files=/go/jaeger-ui/", "--log-level=debug"]
volumes:
esdata1:
driver: local
eslog:
driver: local
networks:
elastic-jaeger:
driver: bridge
elasticsearch
1 | mkdir -p /works/conf/elasticsearch |
jaeger-collector
1 | docker run -d --name jaeger-collector \ |
jaeger-query
1 | docker run -d --name jaeger-query \ |
kibana
1 | docker run -d --name jaeger-kibana \ |
jaeger-agent
1 | docker run -d --name jaeger-agent \ |
spark-dependencies
参考: https://github.com/jaegertracing/spark-dependencies
测试好好久,docker不能分析出对应的依赖关系,用jar就可以。找不到问题所在。只能用jar包:
1 | git clone https://github.com/jaegertracing/spark-dependencies.git |
以下是doker的安装方式:
1 | docker run -it --rm --name spark-dependencies \ |
也可以自己写Dockerfile
1 | FROM java:8-jdk |
客户端集成
以spring-cloud为例,添加以下依赖:
参考:
https://github.com/opentracing-contrib/meta
https://github.com/opentracing-contrib/java-spring-cloud
https://github.com/opentracing-contrib/java-spring-jaeger
普通spring-web项目使用:
https://github.com/opentracing-contrib/java-spring-web
添加依赖:
1 | <dependency> |
application.yml:
1 | opentracing: |
skywalking
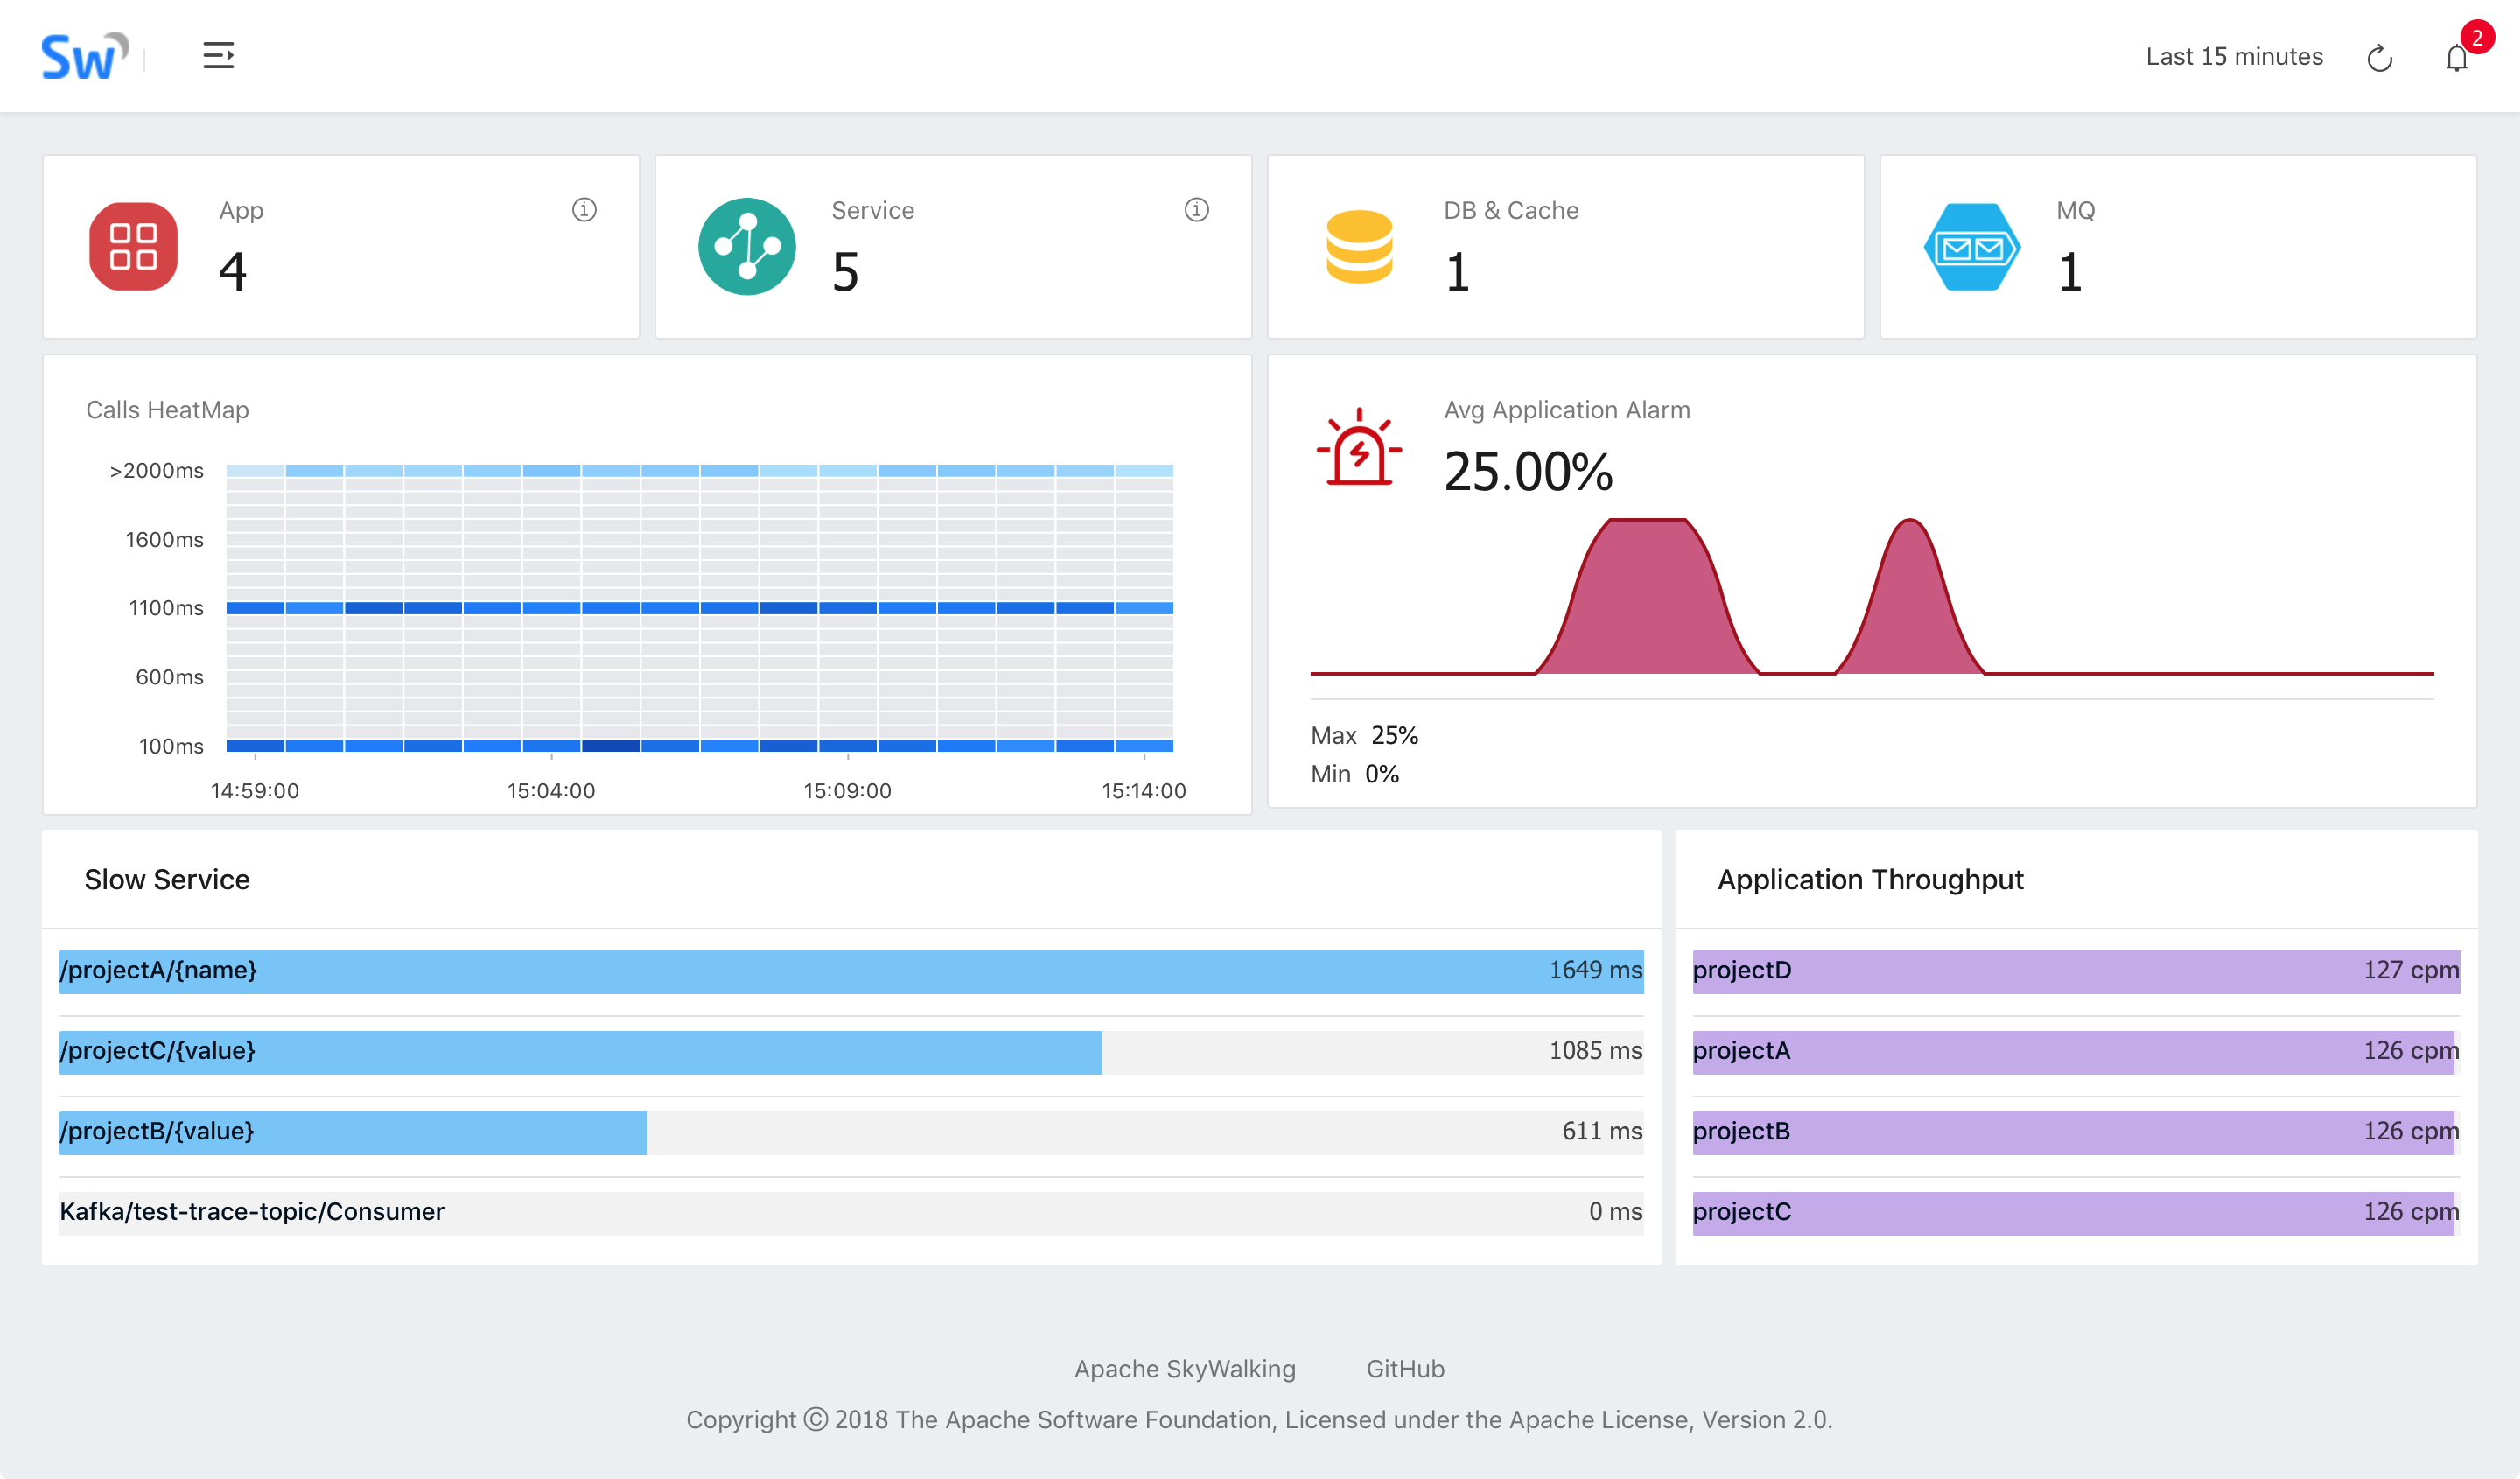
针对分布式系统的APM(应用性能监控)系统,特别针对微服务、cloud native和容器化(Docker, Kubernetes, Mesos)架构, 其核心是个分布式追踪系统。
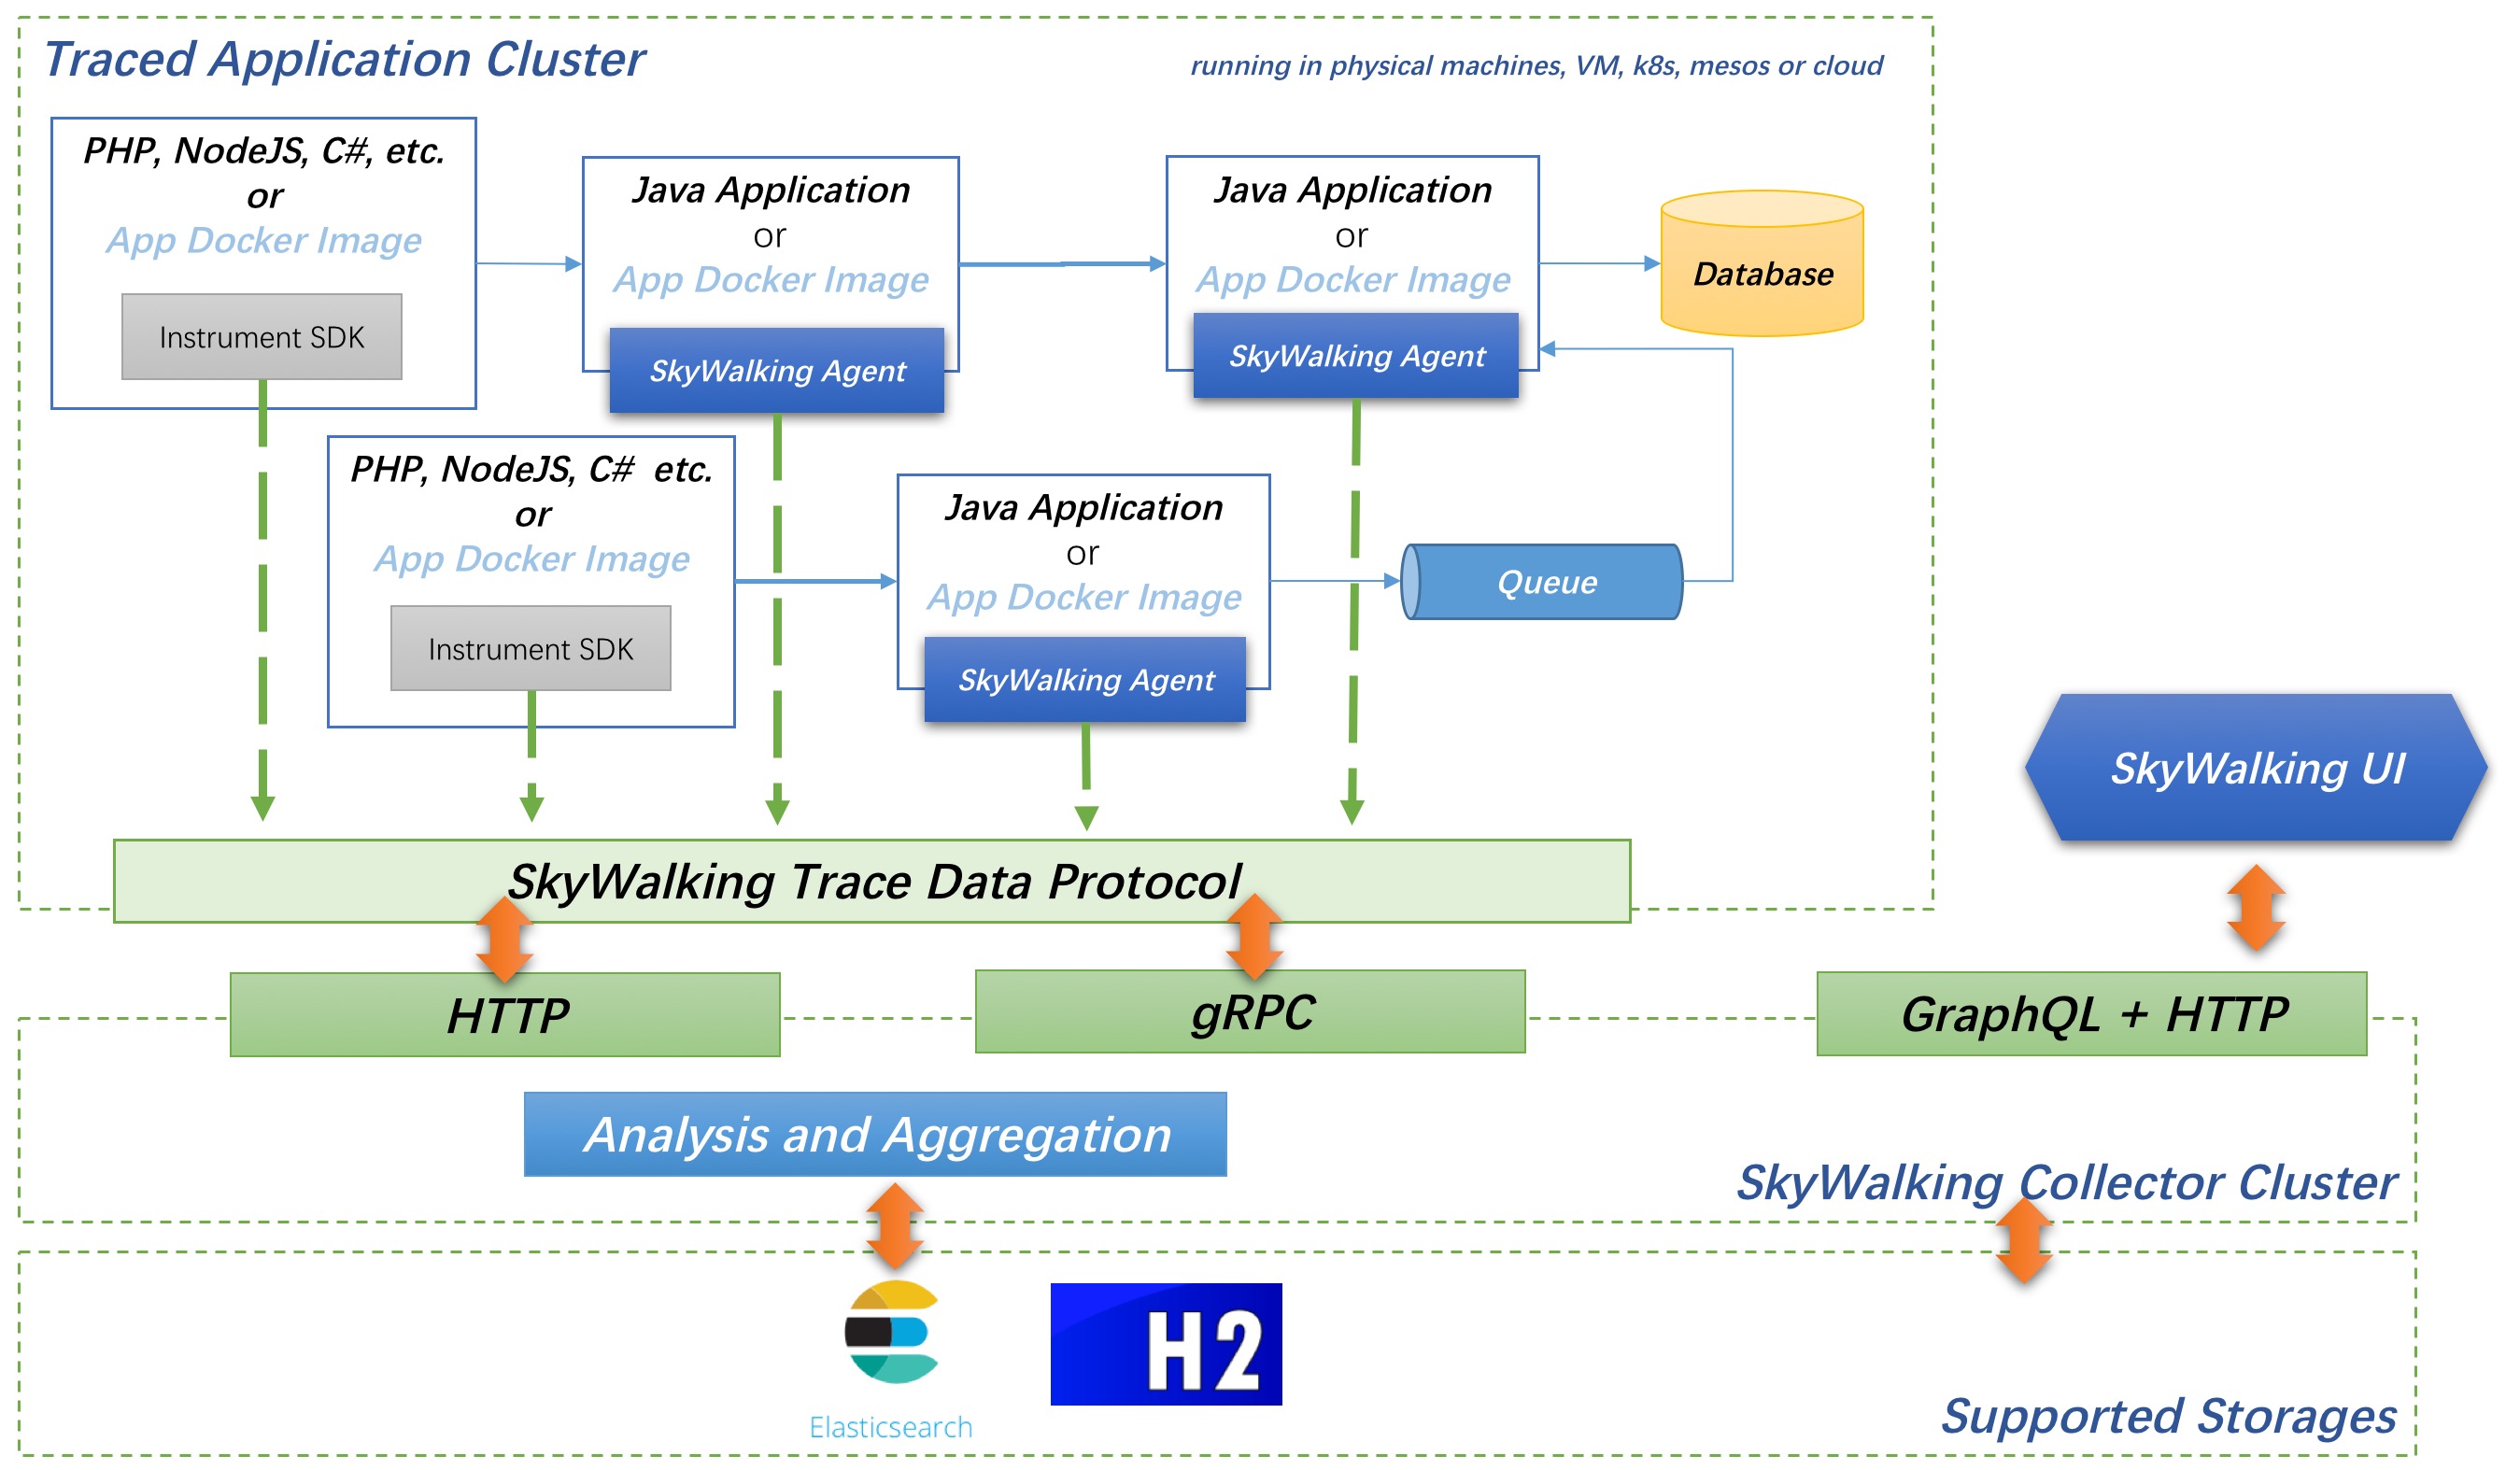
安装
安装elasticsearch:
1 | mkdir -p /works/conf/elasticsearch |
optional: elasticsearch-head ui:
1 | docker run -d --name elasticsearch-head -p 9100:9100 mobz/elasticsearch-head:5 |
optional: kibana ui:
1 | docker run -d --name kibana \ |
安装Collector与Web:
1 | wget http://apache.01link.hk/incubator/skywalking/5.0.0-beta/apache-skywalking-apm-incubating-5.0.0-beta.tar.gz |
配置
config/application.yml:1
2
3
4
5
6
7
8
9
10
11naming:
jetty:
host: 0.0.0.0
port: 10800
contextPath: /
...
agent_gRPC:
gRPC:
host: 192.168.108.1
port: 11800
...
主要需要修改以上两个配置,不然分开部署的话访问不了。另外机器的时间也需要同步。
启动Collector与Web
1 | cd apache-skywalking-apm-incubating/bin |
agent
复制apache-skywalking-apm-incubating目录下的agent,需要保持目录结构不变。修改config/agent.config:
1 | ... |
在启动时加入-javaagent即可:
1 | java -javaagent:/agent/skywalking-agent.jar -jar xxx.jar |
也可以在启动中覆盖agent.config中的agent.application_code或collector.servers参数,注意:一定要以skywalking.开头,详见Setting-override:
1 | java -javaagent:/agent/skywalking-agent.jar -Dskywalking.agent.application_code=app-gateway -jar xxx.jar |
默认情况下会收集除了agent.ignore_suffix参数中以这些后缀结尾的链接,但这个不能满足其他的排除条件,可以通过可选插件apm-trace-ignore-plugin:
1 | #maven must be > 3.1.0 |
将apm-sniffer/optional-plugins/trace-ignore-plugin/apm-trace-ignore-plugin.config 复制到agent/config/ 目录下,加上配置:
1
trace.ignore_path=/eureka/**,Mysql/JDBI/**,Hystrix/**,/swagger-resources/**
将apm-trace-ignore-plugin-x.jar拷贝到agent/plugins后,重启探针即可生效。
参考
http://tech.lede.com/2017/04/19/rd/server/SpringCloudSleuth/
https://segmentfault.com/a/1190000008629939
https://mykite.github.io/2017/04/21/zipkin%E7%AE%80%E5%8D%95%E4%BB%8B%E7%BB%8D%E5%8F%8A%E7%8E%AF%E5%A2%83%E6%90%AD%E5%BB%BA%EF%BC%88%E4%B8%80%EF%BC%89/
https://github.com/jukylin/blog/blob/master/Uber%E5%88%86%E5%B8%83%E5%BC%8F%E8%BF%BD%E8%B8%AA%E7%B3%BB%E7%BB%9FJaeger%E4%BD%BF%E7%94%A8%E4%BB%8B%E7%BB%8D%E5%92%8C%E6%A1%88%E4%BE%8B%E3%80%90PHP%20%20%20Hprose%20%20%20Go%E3%80%91.md
https://github.com/jaegertracing/jaeger
https://github.com/opentracing-contrib/java-spring-cloud
https://github.com/opentracing-contrib/java-spring-jaeger
https://github.com/opentracing-contrib/java-spring-zipkin
https://github.com/jaegertracing/spark-dependencies
https://my.oschina.net/u/2548090/blog/1821372