Jenkins代码质量扫描与自动化部署

本文记录一下Jenkins代码质量扫描与自动化部署的全过程。

Jenkins安装

Jenkins 是一个开源项目,提供了一种易于使用的持续集成系统,使开发者从繁杂的集成中解脱出来,专注于更为重要的业务逻辑实现上。同时 Jenkins 能实施监控集成中存在的错误,提供详细的日志文件和提醒功能,还能用图表的形式形象地展示项目构建的趋势和稳定性。

war安装

JENKINS_VERSION:2.73.3

1
2
3
4
wget http://mirrors.jenkins.io/war-stable/latest/jenkins.war
mkdir -p /var/jenkins
export JENKINS_HOME=/var/jenkins
java -jar jenkins.war --httpPort=9999

初始登录密码在jenkins启动时可以看到。

docker安装

1
2
3
4
5
6
7
8
9
10
#https://github.com/jenkinsci/docker/blob/master/README.md
mkdir /var/jenkins
chown 1000:1000 -R /var/jenkins /works/jenkins
docker run --name myjenkins -p 9999:8080 -p 50000:50000 \
-e "JAVA_OPTS=-Xms512m -Xmx512m" \
-v /works/jenkins/.gradle:/var/jenkins_home/.gradle \
-v /works/jenkins/.m2:/var/jenkins_home/.m2 \
-v /var/jenkins:/var/jenkins_home \
-v /works/jenkins:/works/jenkins \
jenkins/jenkins:lts

也可以自己写Dockerfile编译:

1
2
3
4
5
6
7
8
9
10
11
12
13
14
15
16
17
18
19
20
21
22
23
24
25
26
27
28
29
30
31
32
33
34
35
36
# Version: 1.0.0
FROM centos
MAINTAINER xxx.xxx.com
#ENV JENKINS_HOME /usr/local/jenkins

#VOLUME [ "/var/jenkins_home", "/usr/local/jenkins" ]


RUN yum install -y unzip git

ADD java.sh /etc/profile.d/
ADD jenkins_env.tgz /usr/local/
ADD settings.xml ~/.m2/

RUN ln -s /usr/local/apache-ant-1.10.1 /usr/local/ant \
&& ln -s /usr/local/groovy-2.4.10 /usr/local/groovy \
&& ln -s /usr/local/apache-maven-3.3.9 /usr/local/maven \
&& ln -s /usr/local/gradle-3.4 /usr/local/gradle \
&& ln -s /usr/local/jdk1.7.0_80 /usr/local/jdk1.7

RUN chmod +x /usr/local/gradle/bin/gradle /usr/local/maven/bin/mvn /usr/local/ant/bin/ant /usr/local/groovy/bin/groovy

#RUN sed -i 's;SELINUX=.*;SELINUX=disabled;' /etc/selinux/config
RUN sed -i 's;LANG=.*;LANG="zh_CN.UTF-8";' /etc/locale.conf
#RUN timedatectl set-timezone Asia/Shanghai

RUN echo -e 'search xxx.com \nnameserver 192.168.100.101 \nnameserver 114.114.114.114' > /etc/resolv.conf

RUN . /etc/profile.d/java.sh

COPY jenkins.war /usr/local/jenkins/

WORKDIR /usr/local/jenkins
ENTRYPOINT [ "/usr/local/jdk1.7/bin/java", "-Xmx2048M", "-Xms2048M", "-XX:PermSize=128M", "-XX:MaxPermSize=512m", "-jar", "-DJENKINS_HOME=/var/jenkins_home", "jenkins.war" ]
#CMD ["-h"]
#EXPOSE 80

java.sh

1
2
3
4
5
6
7
8
export JAVA_HOME=/usr/local/jdk1.7
export MVN_HOME=/usr/local/maven
export GRADLE_HOME=/usr/local/gradle
export GRADLE_USER_HOME=jenkins_home/.gradle
export ANT_HOME=/usr/local/ant
export GROOVY_HOME=/usr/local/groovy
export JENKINS_HOME=/var/jenkins_home
export PATH=$JAVA_HOME/bin:$MVN_HOME/bin:$GRADLE_HOME/bin:$ANT_HOME/bin:$GROOVY_HOME/bin:$PATH

plugin安装

需要安装以下插件:

  • Ant
  • Build Pipeline
  • Project statistics
  • Static Analysis Collector
  • Checkstyle
  • PMD
  • FindBugs
  • JaCoCo
  • DRY
  • Git Parameter
  • Extensible Choice Parameter
  • Gradle
  • Publish Over SSH
  • Email Extension
  • Configuration Slicing
  • Environment Injector

环境配置

java/maven/git环境配置

登录jenkins后,在:系统管理->Global Tool Configuration中配置。

Jenkins Location

登录jenkins后,在:系统管理->系统设置中配置,用于设置管理员的邮箱地址。

Extended E-mail Notification

配置以下信息:
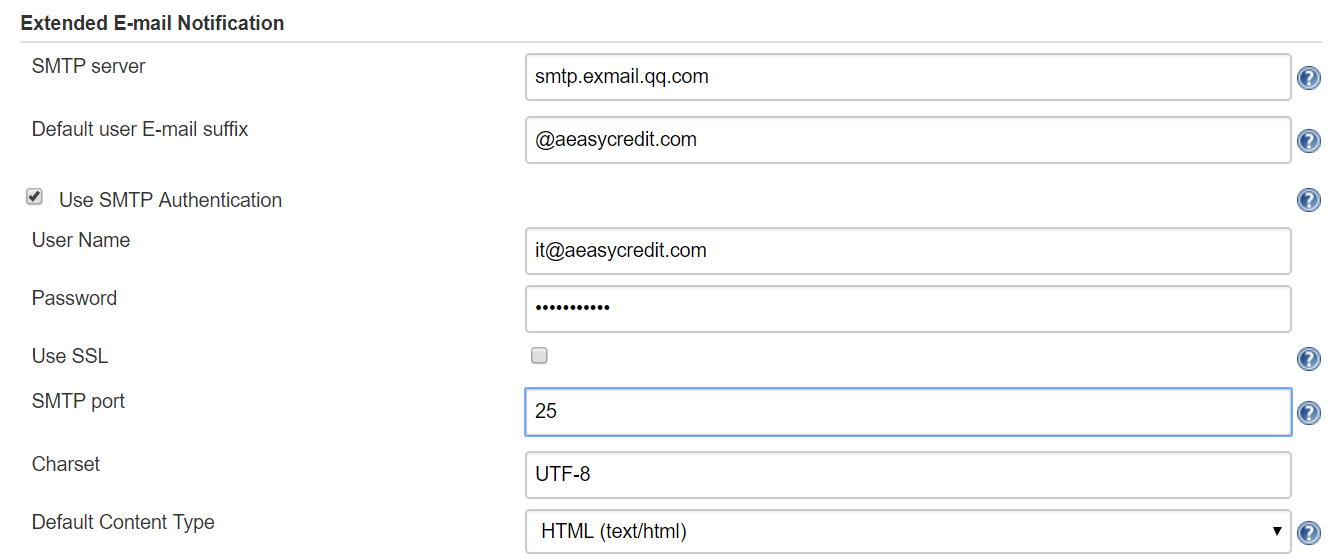
jenkins_sendmail

Default Subject:

1
构建通知:$PROJECT_NAME - Build # $BUILD_NUMBER - $BUILD_STATUS!

Default Content:

1
2
3
4
5
6
7
8
9
10
11
12
13
14
15
16
17
18
19
20
21
22
23
24
25
26
27
<hr/>

(本邮件是程序自动下发的,请勿回复!)<br/><hr/>

项目名称:$JOB_NAME<br/><hr/>

项目描述:$JOB_DESCRIPTION<br/><hr/>

构建编号:$BUILD_NUMBER<br/><hr/>

构建状态:$BUILD_STATUS<br/><hr/>

触发原因:${CAUSE}<br/><hr/>

构建地址:<a href="$BUILD_URL">$BUILD_URL</a><br/><hr/>

构建日志地址:<a href="${BUILD_URL}console">${BUILD_URL}console</a><br/><hr/>

git地址:<a href="$GIT_URL">${GIT_URL}</a><hr/>

git版本号:${GIT_BRANCH}<br/><hr/>

变更集:${JELLY_SCRIPT,template="template.jelly"}<br/><hr/>

$PROJECT_NAME - Build # $BUILD_NUMBER - $BUILD_STATUS:

Check console output at <a href="$BUILD_URL">$BUILD_URL</a> to view the results.

对应的变量请参考https://www.cnblogs.com/weiweifeng/p/8295724.html

邮件模板

template.jelly文件放在$JENKINS_HOME的email-templates目录中。

Default Pre-send Script

有时候可能想在手动点击Build时,只发邮件给自己。或者是想临时过滤某些账户,可以通过Default Pre-send Script来实现,在Jenkins—>配置中配置Default Pre-send Script:

1
2
3
4
5
6
7
8
9
10
11
12
13
14
15
16
17
18
19
20
21
22
23
24
25
26
27
28
29
30
31
32
33
34
35
36
37
38
39
40
41
42
43
44
45
46
47
48
49
50
51
52
53
54
55
56
57
// https://wiki.jenkins-ci.org/display/JENKINS/Email-ext+Recipes#Email-extRecipes-AdditionalTemplatesIntheSourceCode
def buildCauses = build.causes

def excludeEmails = []

if (build.result.toString().equals("FAILURE")) {
msg.addHeader("X-Priority", "1 (Highest)");
msg.addHeader("Importance", "High");
}

def getTriggeredEmail(cause) {
def email = ""
if(cause instanceof hudson.model.Cause.UpstreamCause) {
for(def p in cause.upstreamCauses) {
if(p instanceof hudson.model.Cause.UserIdCause) {
def user = User.get(p.userId)
email = user.getProperty(hudson.tasks.Mailer.UserProperty.class).getAddress()
if(email!=null && !email.equals("")) {
break
}
}
}
} else if(cause instanceof hudson.model.Cause.UserIdCause) {
def user = User.get(cause.userId)
email = user.getProperty(hudson.tasks.Mailer.UserProperty.class).getAddress()
}
return email
}

for(def cause in buildCauses) {
try {
if(cause.shortDescription.indexOf("Started by upstream") != -1 || cause.shortDescription.indexOf("Started by downstream") != -1) {
cancel = true
} else if(cause.shortDescription.indexOf("Started by timer") != -1 || cause.shortDescription.indexOf("Started by an SCM change") != -1) {
// Send mail to all recipients
def allEmails = msg.getAllRecipients().findAll { addr ->
return !excludeEmails.contains(addr.address)
} as javax.mail.internet.InternetAddress[]

msg.setRecipients(javax.mail.Message.RecipientType.TO, allEmails)
} else {
String triggeredEmail = getTriggeredEmail(cause)
logger.println("triggeredEmail:"+triggeredEmail)
if(triggeredEmail!=null && !triggeredEmail.equals("")) {
msg.setRecipient(javax.mail.Message.RecipientType.TO, new javax.mail.internet.InternetAddress(triggeredEmail))
// Send mail to logined user
logger.println("Sending email to triggeredEmail:"+triggeredEmail)
} else {
logger.println("Triggered email is empty, send mail canceled!")
cancel = true
}
}
} catch(e) {
logger.println("error:"+e.message)
cancel = true
}
}

静态代码扫描

项目配置

在pom.xml中添加:

1
2
3
4
5
6
7
8
9
10
11
12
13
14
15
16
17
18
19
20
21
22
23
24
25
26
27
28
29
30
31
32
33
34
35
36
37
38
39
40
41
42
43
44
45
46
47
48
49
50
51
52
53
54
55
56
57
58
59
60
61
62
63
64
65
66
67
68
69
70
71
72
73
74
75
76
<plugin>
<groupId>org.apache.maven.plugins</groupId>
<artifactId>maven-eclipse-plugin</artifactId>
<version>2.10</version>
<configuration>
<wtpversion>2.0</wtpversion>
<additionalProjectnatures>
<projectnature>org.eclipse.jdt.core.javanature</projectnature>
<projectnature>net.sf.eclipsecs.core.CheckstyleNature</projectnature>
<projectnature>ch.acanda.eclipse.pmd.builder.PMDNature</projectnature>
<projectnature>edu.umd.cs.findbugs.plugin.eclipse.findbugsNature</projectnature>
</additionalProjectnatures>
<additionalBuildcommands>
<buildcommand>org.eclipse.jdt.core.javabuilder</buildcommand>
<buildcommand>net.sf.eclipsecs.core.CheckstyleBuilder</buildcommand>
<buildcommand>ch.acanda.eclipse.pmd.builder.PMDBuilder</buildcommand>
<buildcommand>edu.umd.cs.findbugs.plugin.eclipse.findbugsBuilder</buildcommand>
</additionalBuildcommands>
</configuration>
</plugin>

<plugin>
<groupId>org.apache.maven.plugins</groupId>
<artifactId>maven-checkstyle-plugin</artifactId>
<version>2.17</version>
<configuration>
<configLocation>http://gitlab.aeasycredit.net/dave.zhao/codecheck/raw/master/checkstyle/checkstyle.xml</configLocation>
<!-- <propertiesLocation>/Developer/checkstyle/checkstyle.properties</propertiesLocation> -->
<propertyExpansion>samedir=http://gitlab.aeasycredit.net/dave.zhao/codecheck/raw/master/checkstyle</propertyExpansion>
<encoding>UTF-8</encoding>
<consoleOutput>true</consoleOutput>
<outputFileFormat>xml</outputFileFormat>
<failsOnError>false</failsOnError>
<linkXRef>false</linkXRef>
</configuration>
</plugin>

<plugin>
<groupId>org.apache.maven.plugins</groupId>
<artifactId>maven-pmd-plugin</artifactId>
<version>3.6</version>
<configuration>
<rulesets>
<ruleset>http://gitlab.aeasycredit.net/dave.zhao/codecheck/raw/master/pmd/myRuleSet.xml</ruleset>
</rulesets>
<encoding>UTF-8</encoding>
<consoleOutput>true</consoleOutput>
<outputFileFormat>xml</outputFileFormat>
<failsOnError>true</failsOnError>
<linkXRef>false</linkXRef>
</configuration>
</plugin>

<plugin>
<groupId>org.codehaus.mojo</groupId>
<artifactId>findbugs-maven-plugin</artifactId>
<version>3.0.4</version>
<configuration>
<failOnError>true</failOnError>
<threshold>Medium</threshold>
<effort>Default</effort>
<maxRank>15</maxRank>
<outputEncoding>UTF-8</outputEncoding>
<sourceEncoding>UTF-8</sourceEncoding>
<includeFilterFile>http://gitlab.aeasycredit.net/dave.zhao/codecheck/raw/master/findbugs/include_filter.xml</includeFilterFile>
</configuration>
<!-- <executions>
<execution>
<id>run-findbugs</id>
<phase>install</phase>
<goals>
<goal>check</goal>
</goals>
</execution>
</executions> -->
</plugin>

代码扫描

1
2
3
4
5
6
7
8
9
10
11
12
13
#checkstyle
#mvn checkstyle:check 有异常时会中断运行
mvn checkstyle:checkstyle

#pmd
mvn pmd:pmd

#重复代码检查
mvn pmd:cpd

#Findbug
#mvn clean install findbugs:check 有异常时会中断运行,并且一定要先编译,因为findbugs是通过class文件来分析的
mvn clean install findbugs:findbugs

对应的checkstyle/pmd/findbugs的相关配置请参考:codecheck.zip

JaCoCo

Eclipse插件

The update site for EclEmma is http://update.eclemma.org/. EclEmma is also available via the Eclipse Marketplace Client, simply search for “EclEmma”.

Maven插件

在pom.xml中添加:

1
2
3
4
5
6
7
8
9
10
11
12
13
14
15
16
17
18
19
20
21
22
23
24
25
26
27
28
29
30
31
32
33
34
35
36
37
38
39
40
41
42
43
44
45
46
47
48
49
50
51
52
53
54
55
56
57
58
59
60
61
62
63
64
65
66
67
68
69
70
71
72
73
74
75
<!-- https://www.cnblogs.com/fnlingnzb-learner/p/10637802.html -->
<!-- https://blog.csdn.net/qq_29611427/article/details/88735366 -->
<!-- skip: mvn clean install -Djacoco.skip=true -->
<plugin>
<groupId>org.jacoco</groupId>
<artifactId>jacoco-maven-plugin</artifactId>
<version>0.8.7</version>
<configuration>
<skip>${skip_jacoco}</skip>
<includes>
<!-- <include>com/**/tenant/mapper/*</include> -->
</includes>
<!-- rules裏面指定覆蓋規則 -->
<rules>
<rule implementation="org.jacoco.maven.RuleConfiguration">
<element>BUNDLE</element>
<limits>  
<!-- 指定方法覆蓋到50% -->
<limit implementation="org.jacoco.report.check.Limit">
<counter>METHOD</counter>
<value>COVEREDRATIO</value>
<minimum>0.00</minimum>
</limit>
<!-- 指定分支覆蓋到50% -->
<limit implementation="org.jacoco.report.check.Limit">
<counter>BRANCH</counter>
<value>COVEREDRATIO</value>
<minimum>0.00</minimum>
</limit>
<!-- 指定類覆蓋到50% -->
<limit implementation="org.jacoco.report.check.Limit">
<counter>CLASS</counter>
<value>COVEREDRATIO</value>
<minimum>0.00</minimum>
<!-- 指定類覆蓋到100%,不能遺失任何類 -->
<!-- <value>MISSEDCOUNT</value> -->
<!-- <maximum>0</maximum> -->
</limit>
<limit>
<counter>COMPLEXITY</counter>
<value>COVEREDRATIO</value>
<!-- 最低覆盖率 -->
<minimum>0.00</minimum>
</limit>
</limits>
</rule>
</rules>
</configuration>
<executions>
<execution>
<id>pre-unit-tests</id>
<goals>
<goal>prepare-agent</goal>
</goals>
</execution>
<!-- Ensures that the code coverage report for unit tests is created after unit tests have been run -->
<execution>
<id>post-unit-test</id>
<phase>test</phase>
<goals>
<goal>report</goal>
</goals>
<configuration>
<dataFile>target/jacoco.exec</dataFile>
<outputDirectory>target/jacoco-ut</outputDirectory>
</configuration>
</execution>
<!-- <execution>
<id>check</id>
<goals>
<goal>check</goal>
</goals>
</execution> -->
</executions>
</plugin>

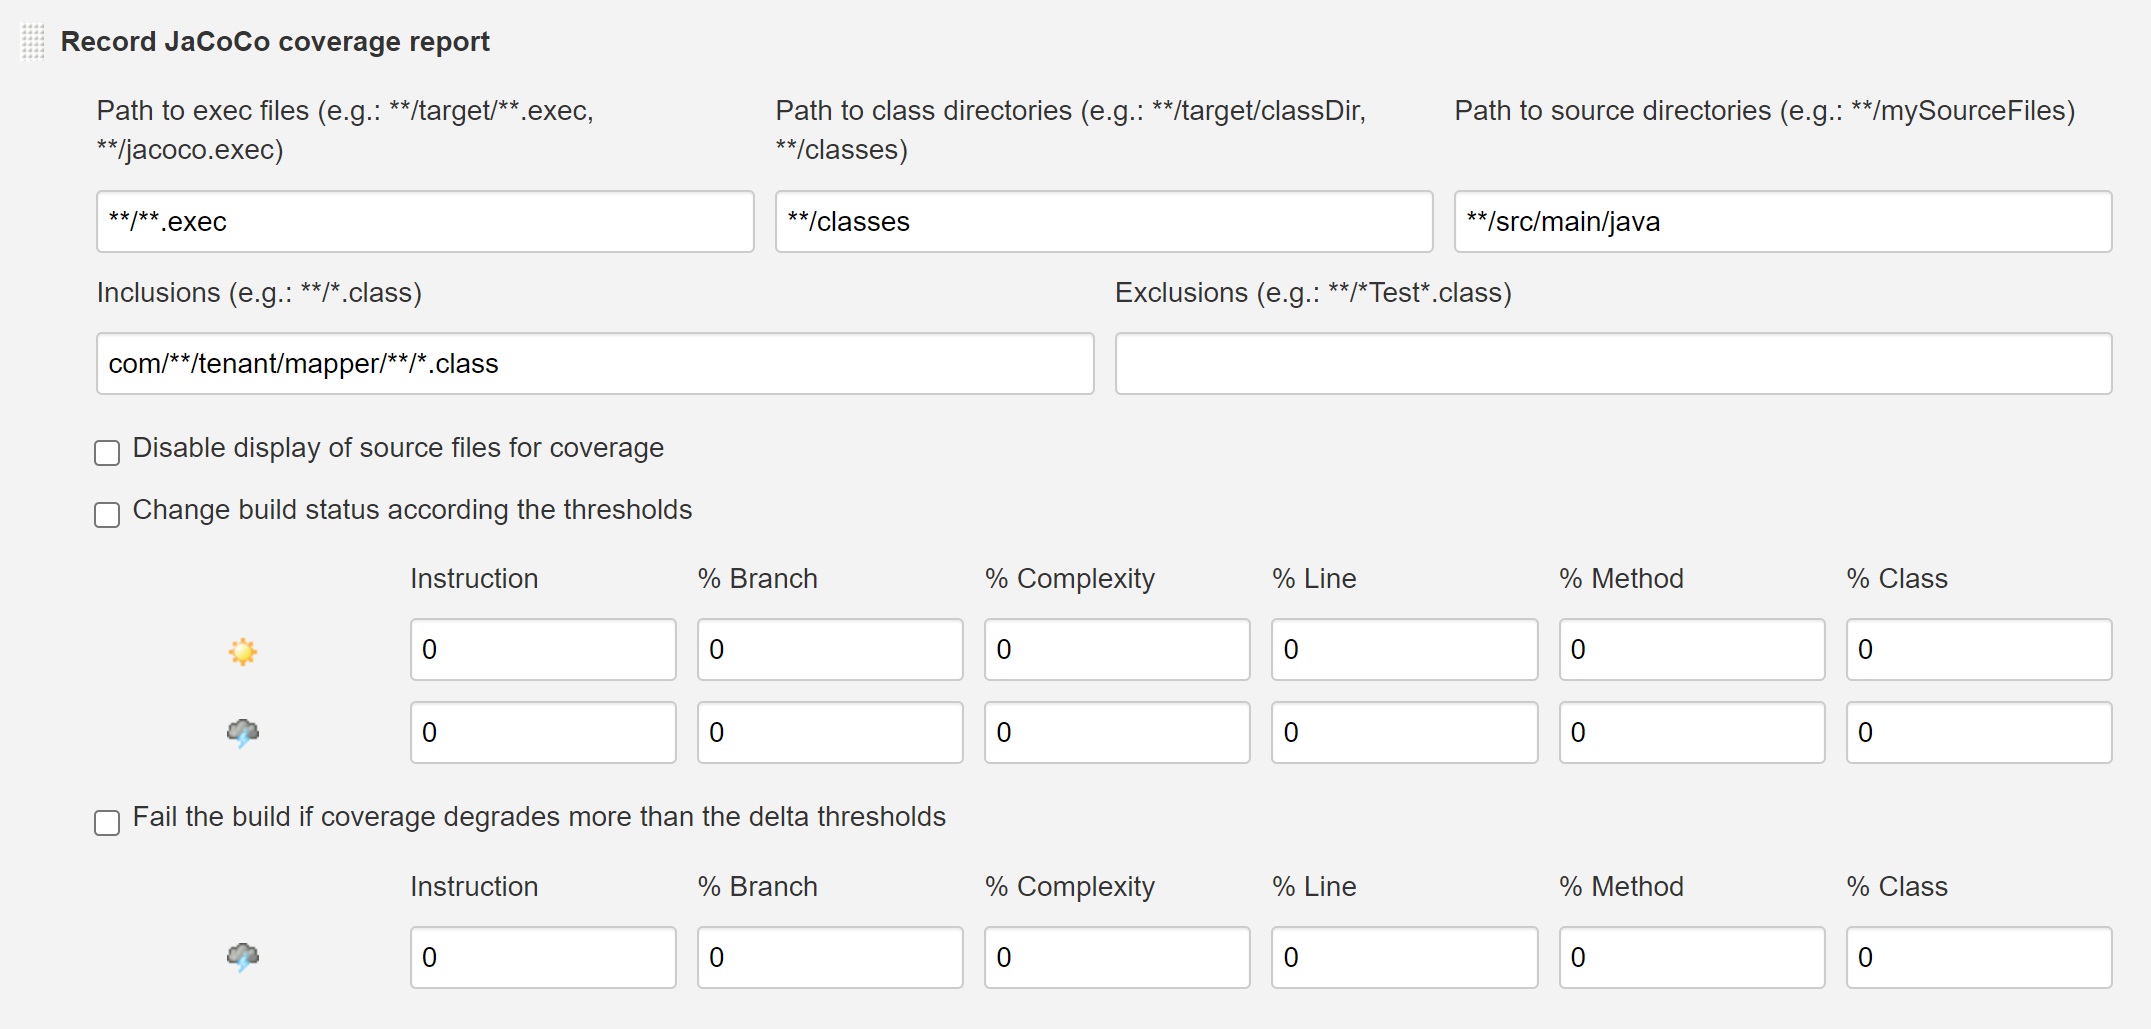
jenkins jacoco插件会有设置rules的地方,如果有使用jenkins的话rules可以不用配置。

代码扫描:

1
2
#mvn clean install jacoco:check 有异常时会中断运行,并且一定要先编译,因为jacoco是通过class文件来分析的
mvn clean install jacoco:report

jenkins项目配置

参数化构建过程

jenkins-config1

注意:
Git parameter只能实现一些简单的过滤条件,如果想实现复杂的过滤的话,可以用Groovy脚本(通过Extensible Choice Plugin实现):
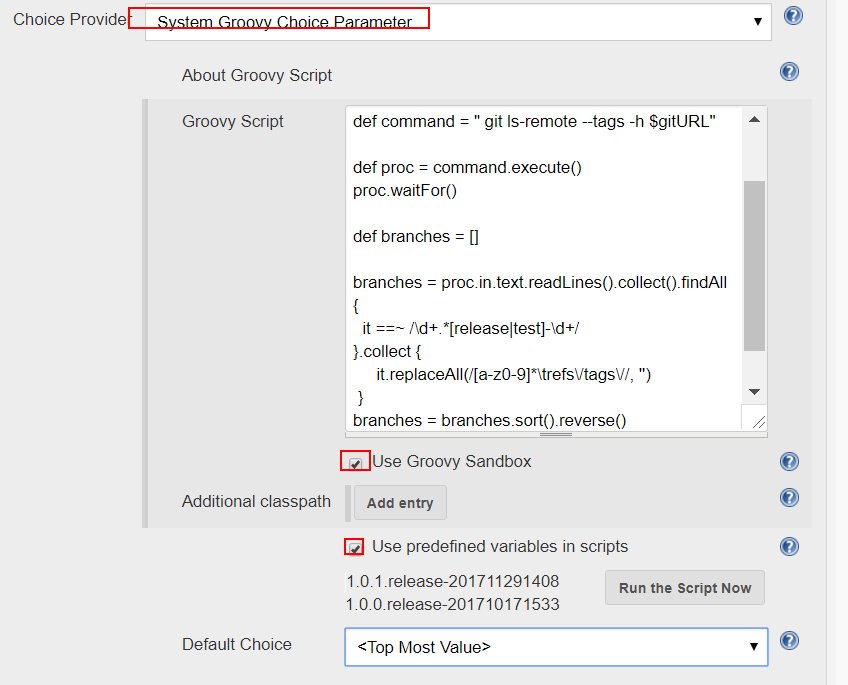
jenkins-config1-1

对应的脚本为:

1
2
3
4
5
6
7
8
9
10
11
12
13
14
15
// https://gist.github.com/lyuboraykov/8deae849e4812669793a
def gitURL = project.scm.key.replace("git ", "")
def command = "git ls-remote --heads -h $gitURL | grep '.x' | sort -t '/' -k 3 -V"
def proc = ['bash', '-c', command].execute()
proc.waitFor()
def branches = []
branches = proc.in.text.readLines().findAll {
// ==~: match =~: find
it =~ /\d+.*\.x$/
}.collect {
//it.replaceAll(/.*/, '')
it = it.replaceAll(/.*\trefs\/heads\//, '')
}.reverse()
//.sort().reverse()
return branches

或者全部通过shell过滤:

1
2
3
4
5
6
7
// https://gist.github.com/lyuboraykov/8deae849e4812669793a
def gitURL = project.scm.key.replace("git ", "")
// refs/heads/1.6.x
def command = "git ls-remote --heads -h $gitURL | awk '{print \$2}' | sort -t '/' -k 3 -V -r | egrep '/[0-9]+\\.[0-9]+\\.x' | sed 's;^refs/heads/;;g'"
def proc = ['bash', '-c', command].execute()
proc.waitFor()
return proc.in.text.readLines()

另外,由于Jenkins的安全限制,groovy没有权限运行,可以通过http://ip:port/scriptApproval/进行授权。

配置仓库
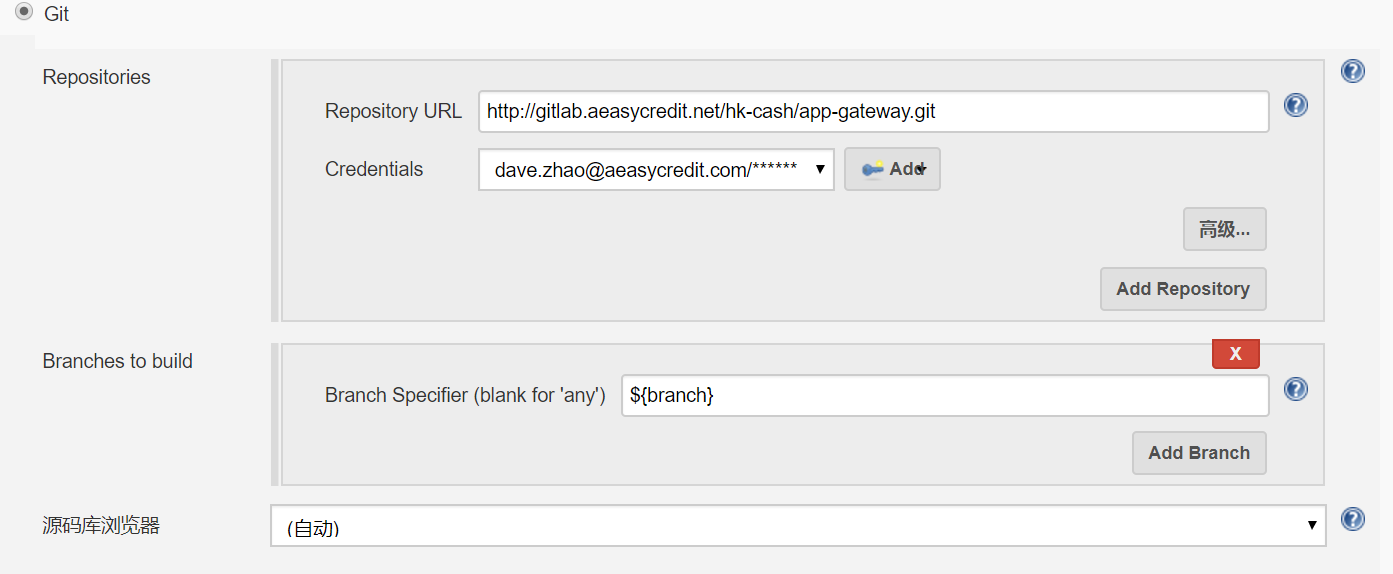
jenkins-config2

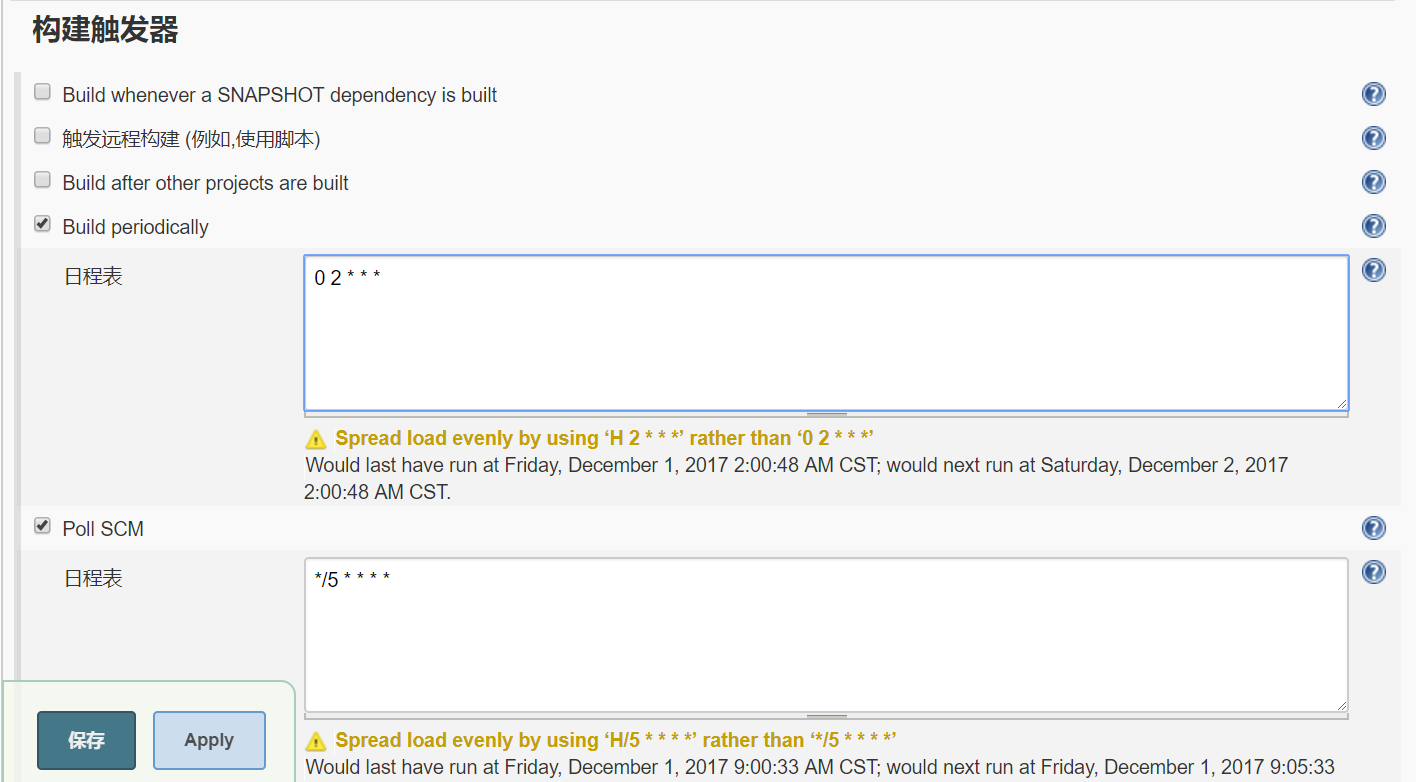
构建触发器

jenkins-config3

Poll SCM:
定时检查源码变更(根据SCM软件的版本号),如果有更新就checkout最新code下来,然后执行构建动作。我的配置如下:

1
*/5 * * * *  (每5分钟检查一次源码变化)

Build periodically:
周期进行项目构建(它不care源码是否发生变化),我的配置如下:

1
0 2 * * *  (每天2:00 必须build一次源码)

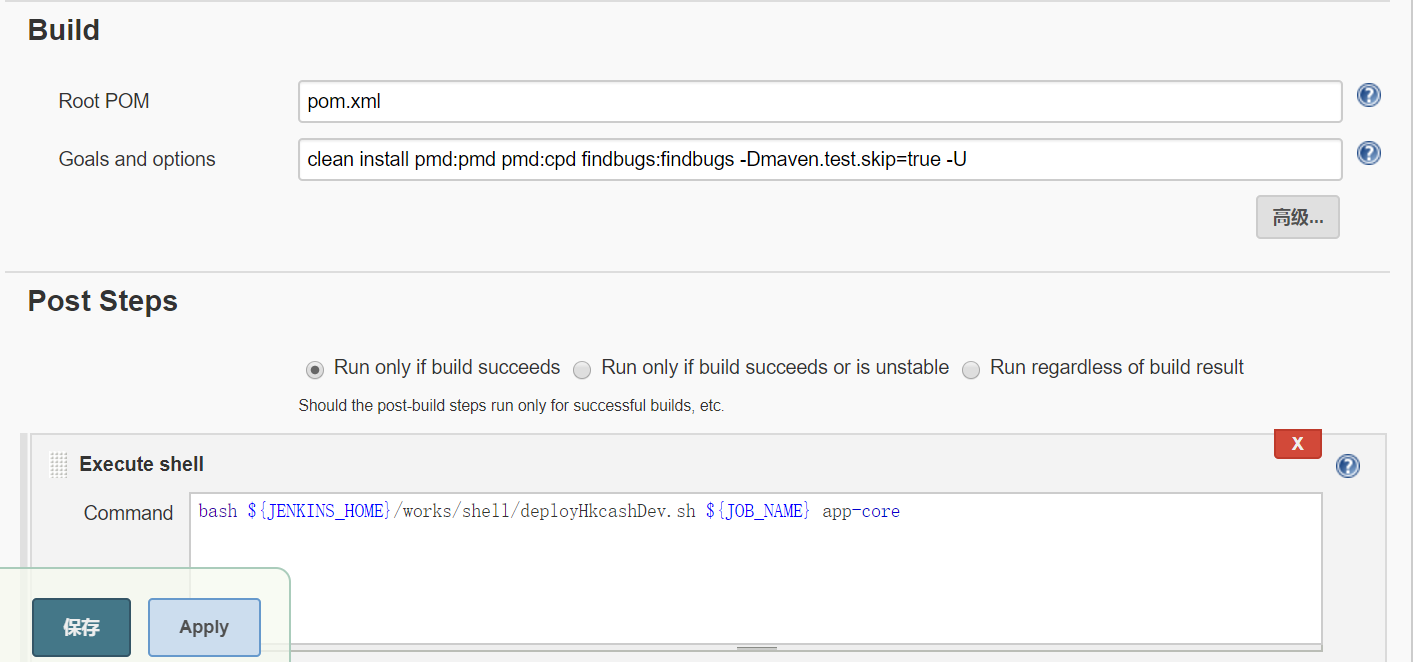
构建

jenkins-config4

注意:
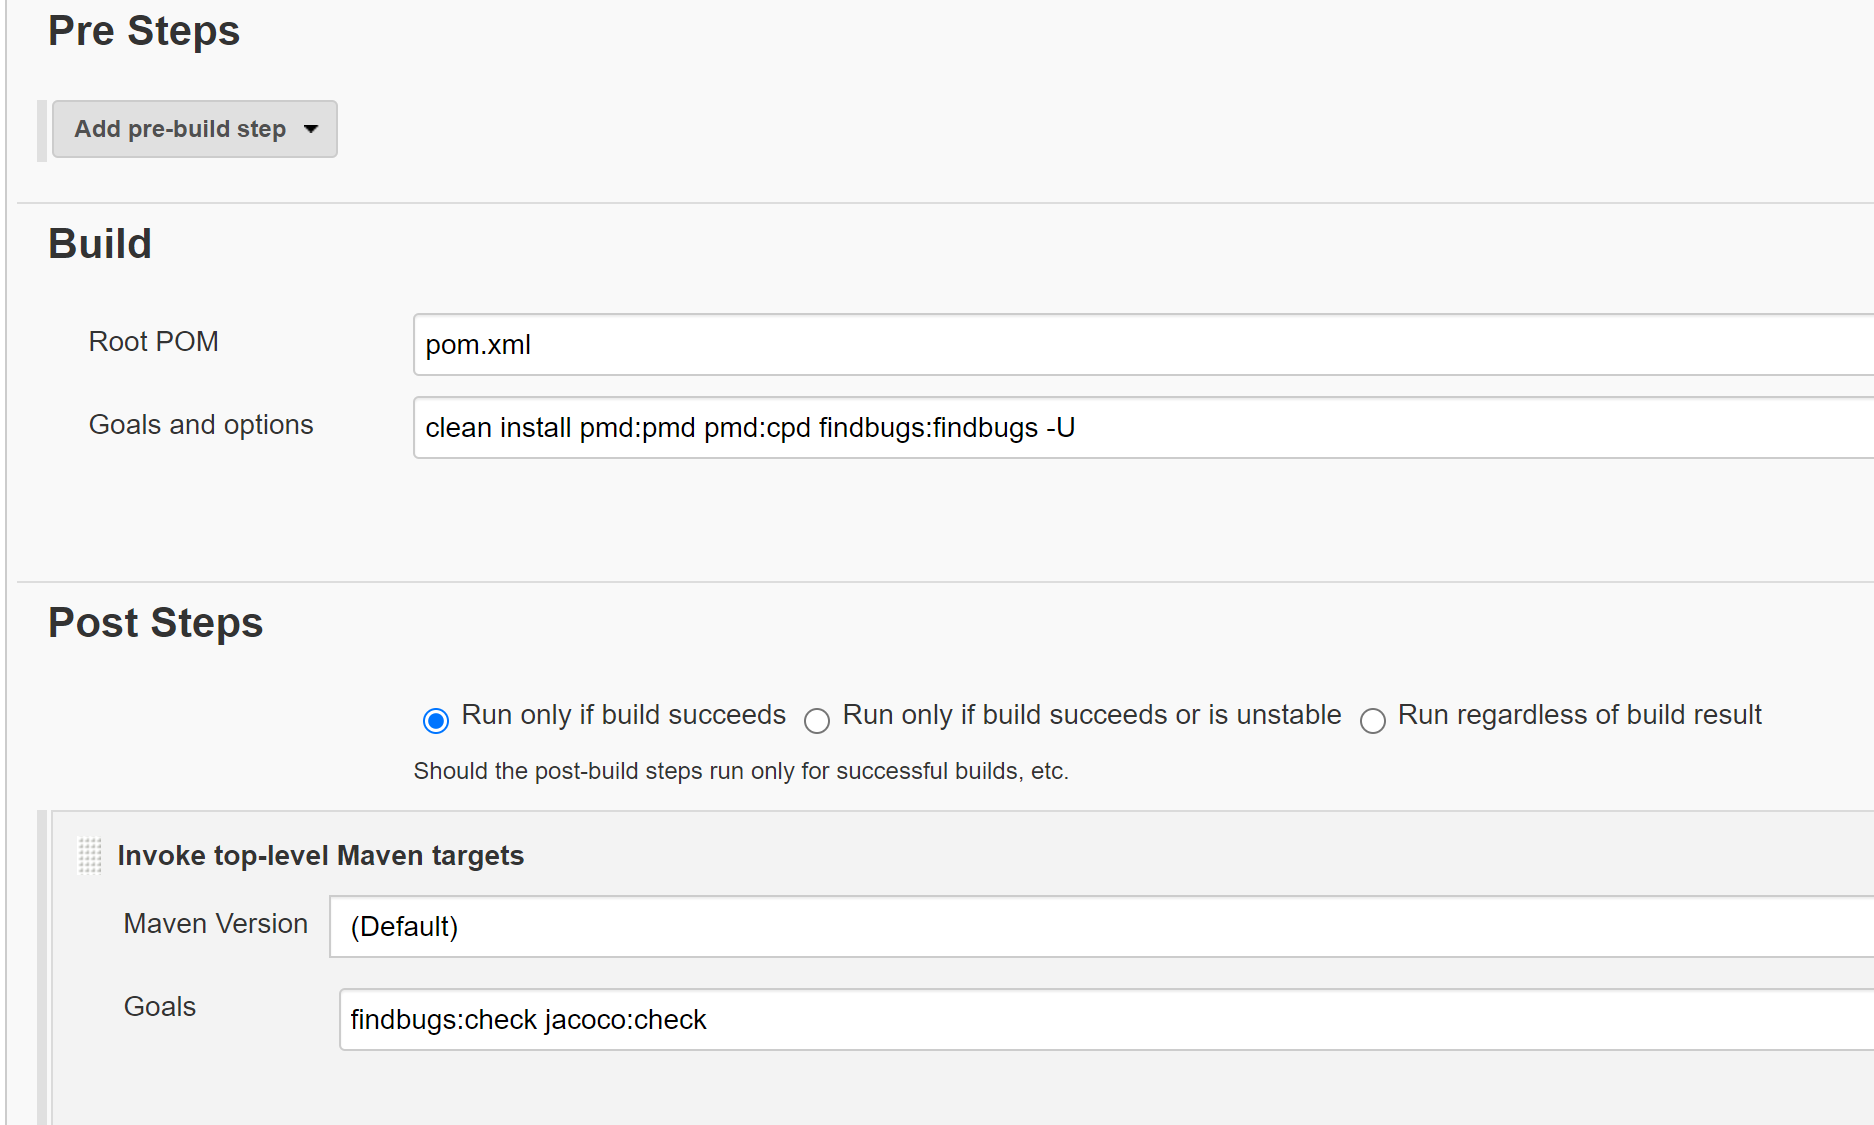
checkstyle:checkstyle pmd:pmd pmd:cpd findbugs:findbugs只会警告,错误时不会退出。如果想显示完整的代码扫描结果,又想在错误时退出,可以进行以下配置:
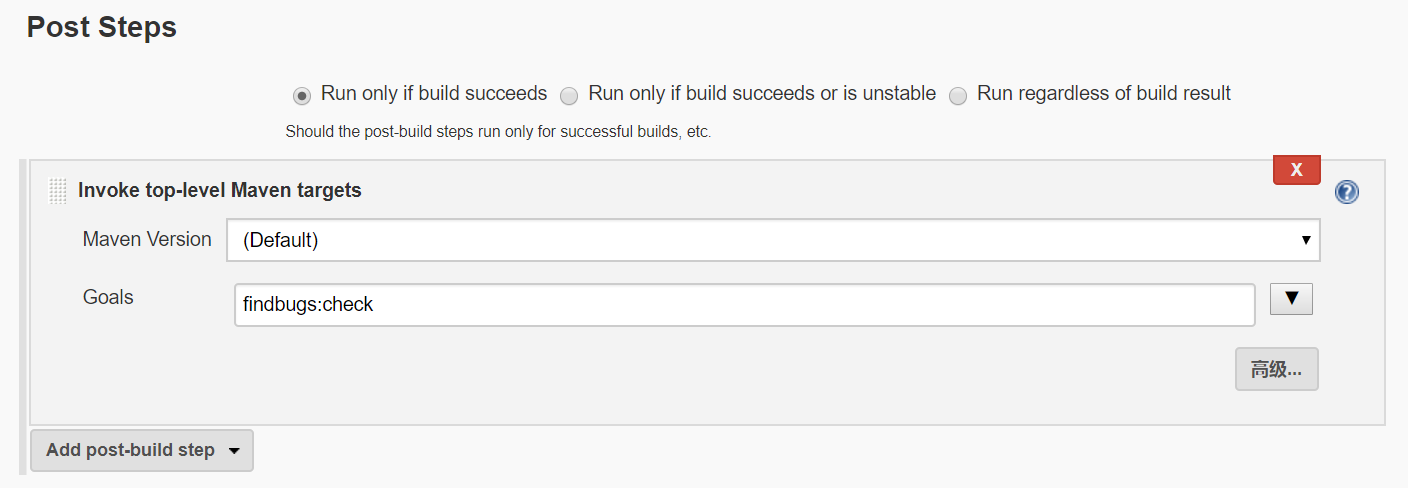
jenkins-config4-1

如果有使用jacoco的话不能跳过测试用例:

jenkins-config4-2

Post Steps:
构建完成后的步骤。一般常用于自动化部署。

参考以下的自动化部署脚本:

1
2
3
4
5
6
7
8
9
10
11
12
13
14
15
16
17
18
19
20
21
22
23
24
25
26
27
28
29
30
31
32
33
34
35
36
37
#!/bin/bash

PATH='/usr/local/sbin:/usr/local/bin:/sbin:/bin:/usr/sbin:/usr/bin'
export PATH
JOBNAME=$1
JARNAME=$2
RUSER='root'
HOST='192.168.108.183'
DEVKEY='/etc/183'
PROJECT_PATH=${JENKINS_HOME}/workspace/${JOBNAME}

if [[ "${JOBNAME}" == "" ]]; then
echo "JOBNAME must not be empty!"
exit 1
fi

dos2unix $PROJECT_PATH/pom.xml
dos2unix $PROJECT_PATH/Dockerfile
dos2unix $PROJECT_PATH/docker.sh
VERSION=`cat ${PROJECT_PATH}/pom.xml|grep version|sed -n "1p"|sed "s;^\s<version>;;"|sed "s;</version>;;"|sed -E 's;\r\n;;'`
echo "VERSION=${VERSION}"
APPNAME=$(echo $JOBNAME|sed 's;\.dev;;')

if [[ "${JARNAME}" == "" ]]; then
JARNAME=$APPNAME
JARFILE="${PROJECT_PATH}/target/${JARNAME}-${VERSION}.jar"
else
JARFILE="${PROJECT_PATH}/${JARNAME}/target/${JARNAME}-${VERSION}.jar"
fi
echo "JARFILE=$JARFILE"

echo "scp -i ${DEVKEY} ${JARFILE} ${RUSER}@${HOST}:/works/app/hkapp/${APPNAME}"
scp -i ${DEVKEY} ${JARFILE} ${RUSER}@${HOST}:/works/app/hkapp/${APPNAME}/
scp -i ${DEVKEY} ${PROJECT_PATH}/Dockerfile ${RUSER}@${HOST}:/works/app/hkapp/${APPNAME}/
scp -i ${DEVKEY} ${PROJECT_PATH}/docker.sh ${RUSER}@${HOST}:/works/app/hkapp/${APPNAME}/

ssh -i ${DEVKEY} ${RUSER}@${HOST} "cd /works/app/hkapp/${APPNAME} && sh docker.sh ${VERSION} ${APPNAME}"

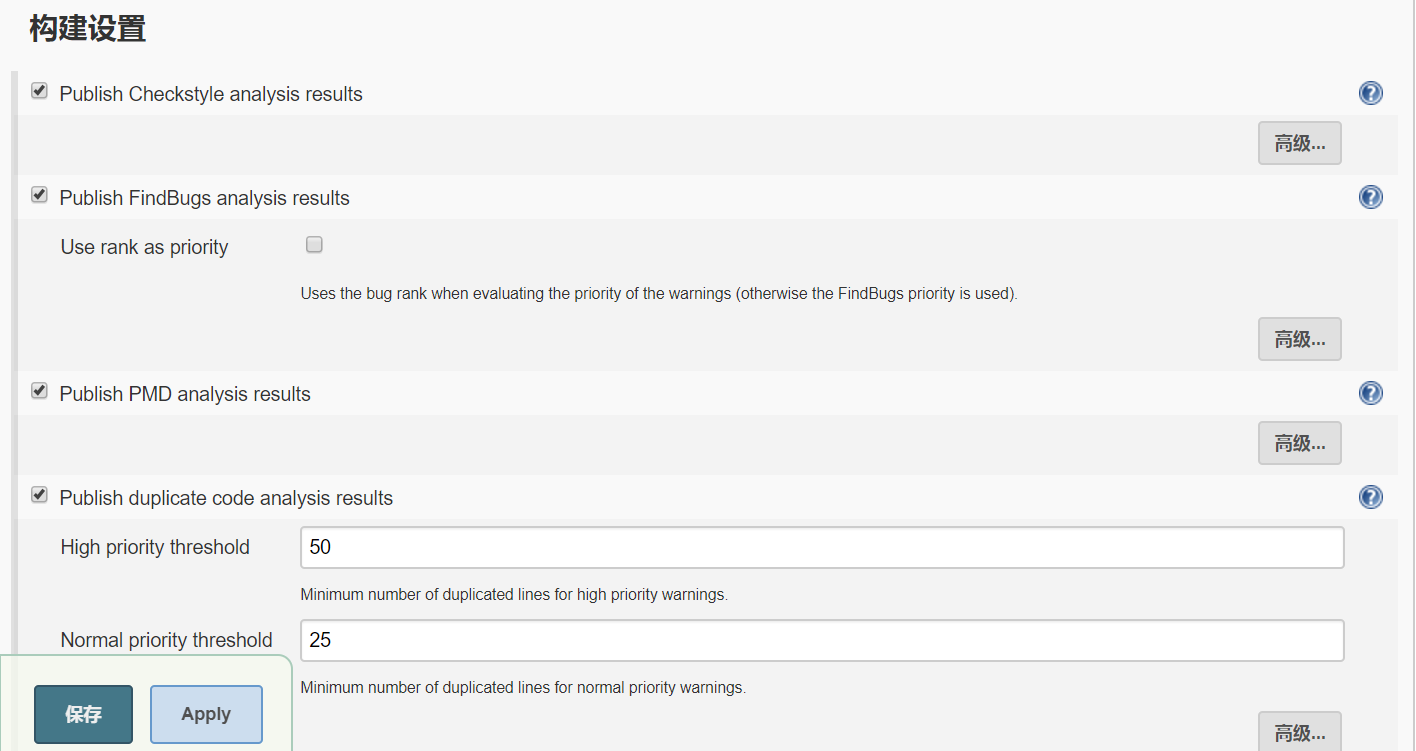
构建设置

jenkins-config5

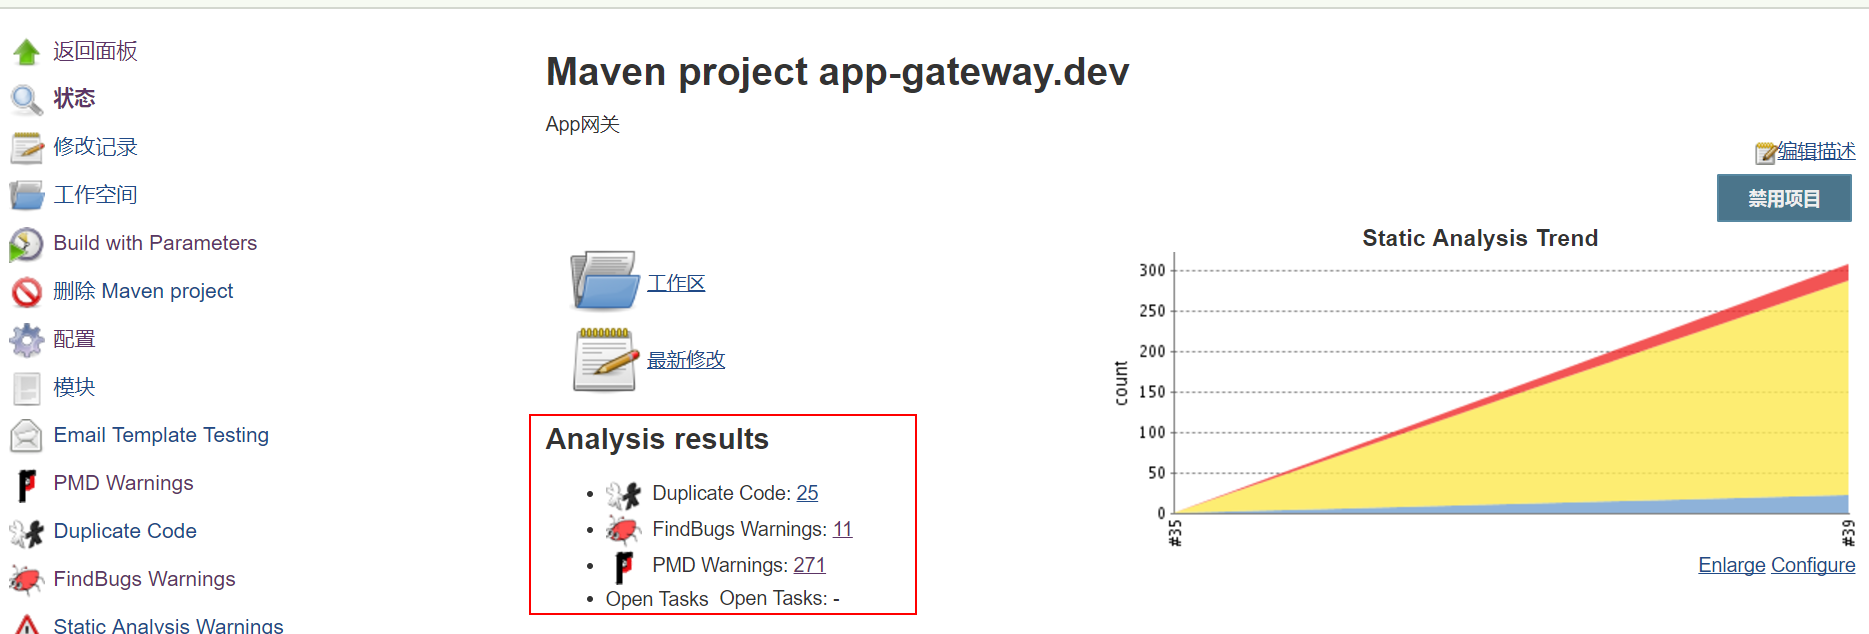
此处将代码质量扫描的结果显示出来:

jenkins-config8

构建后操作

jenkins-config6

jenkins-config10

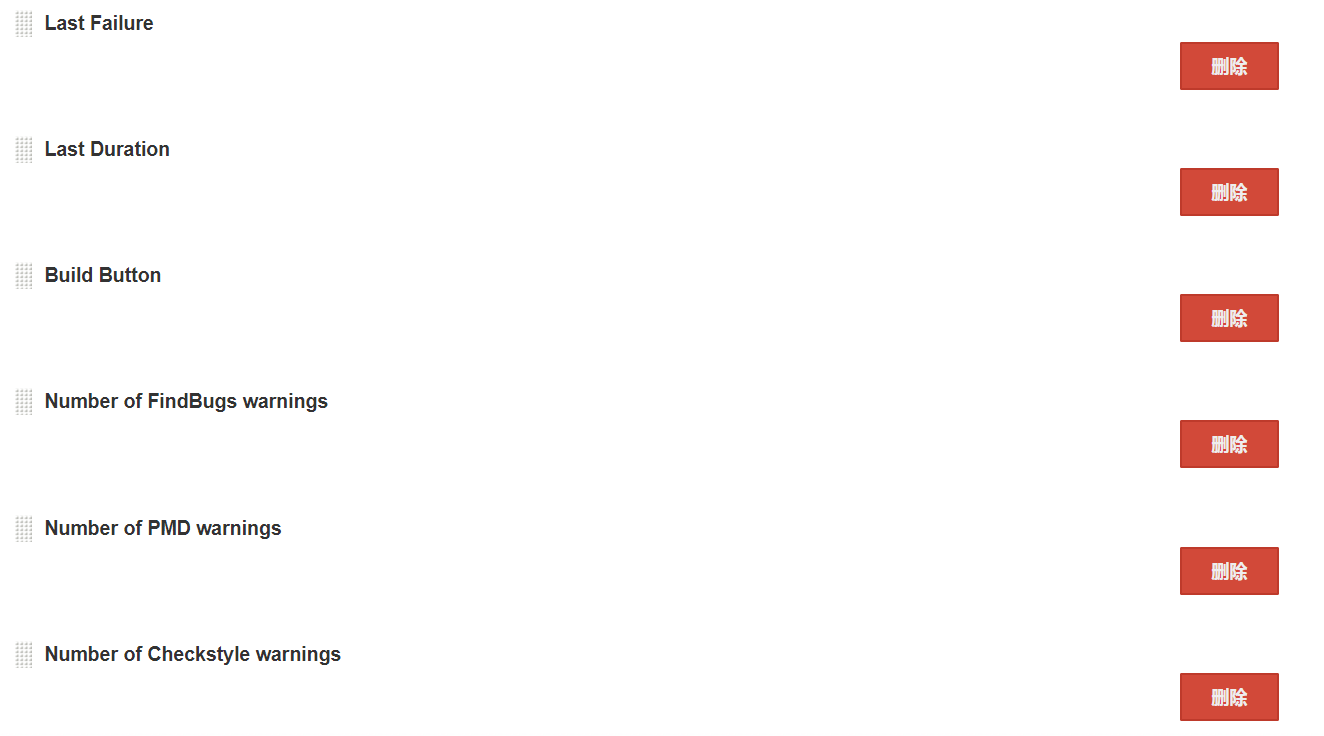
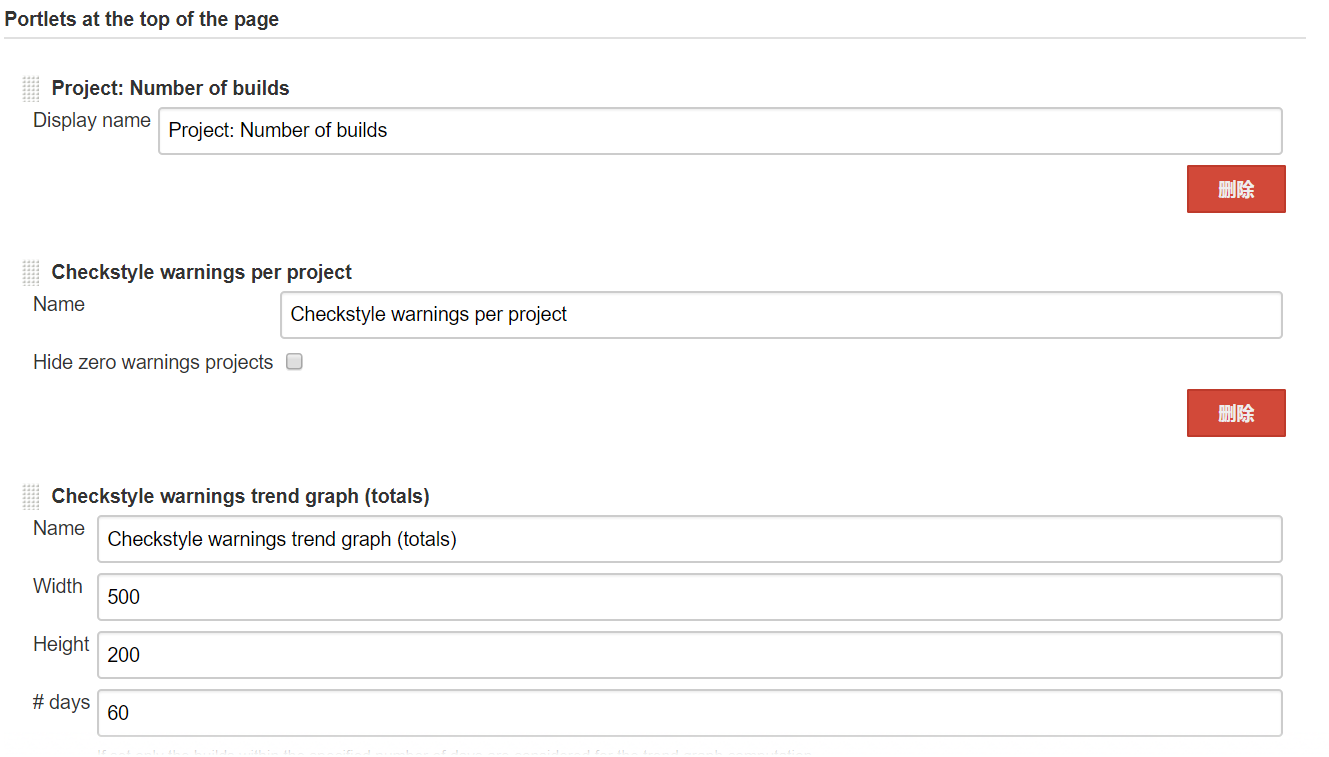
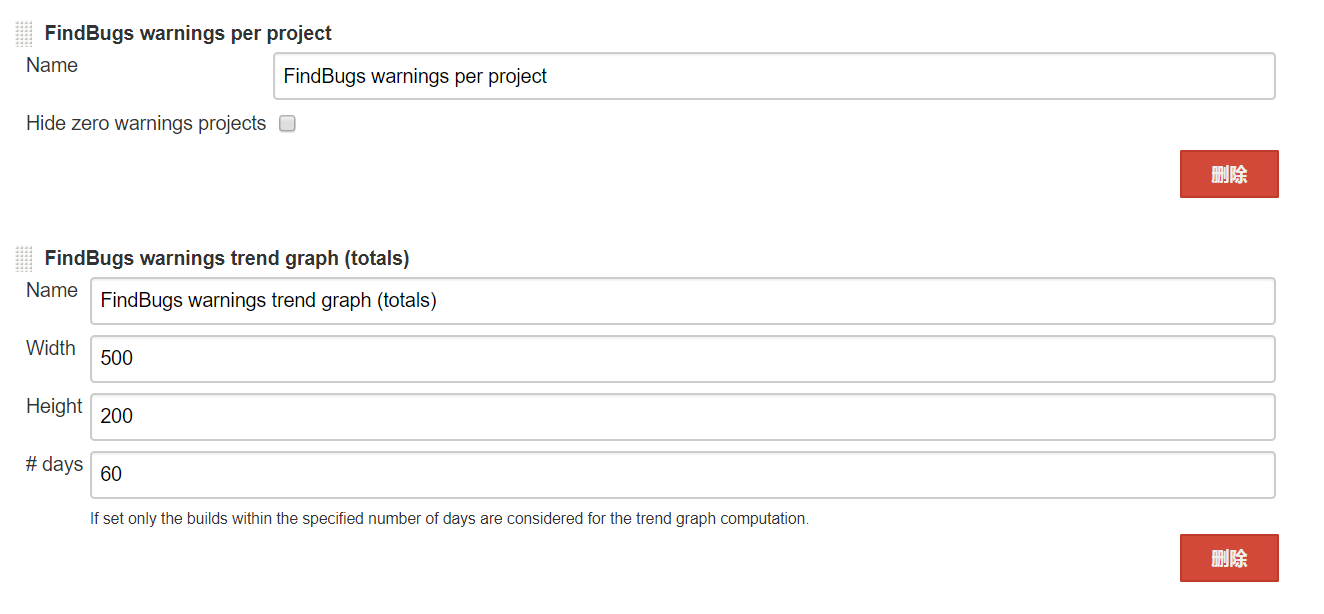
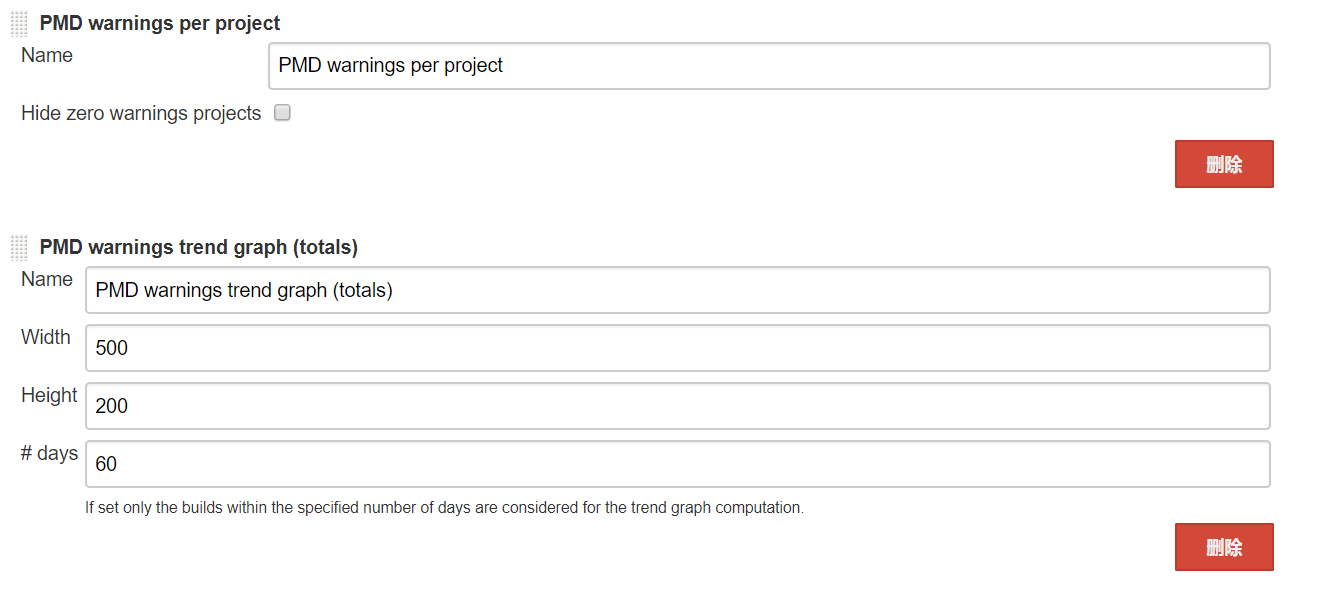
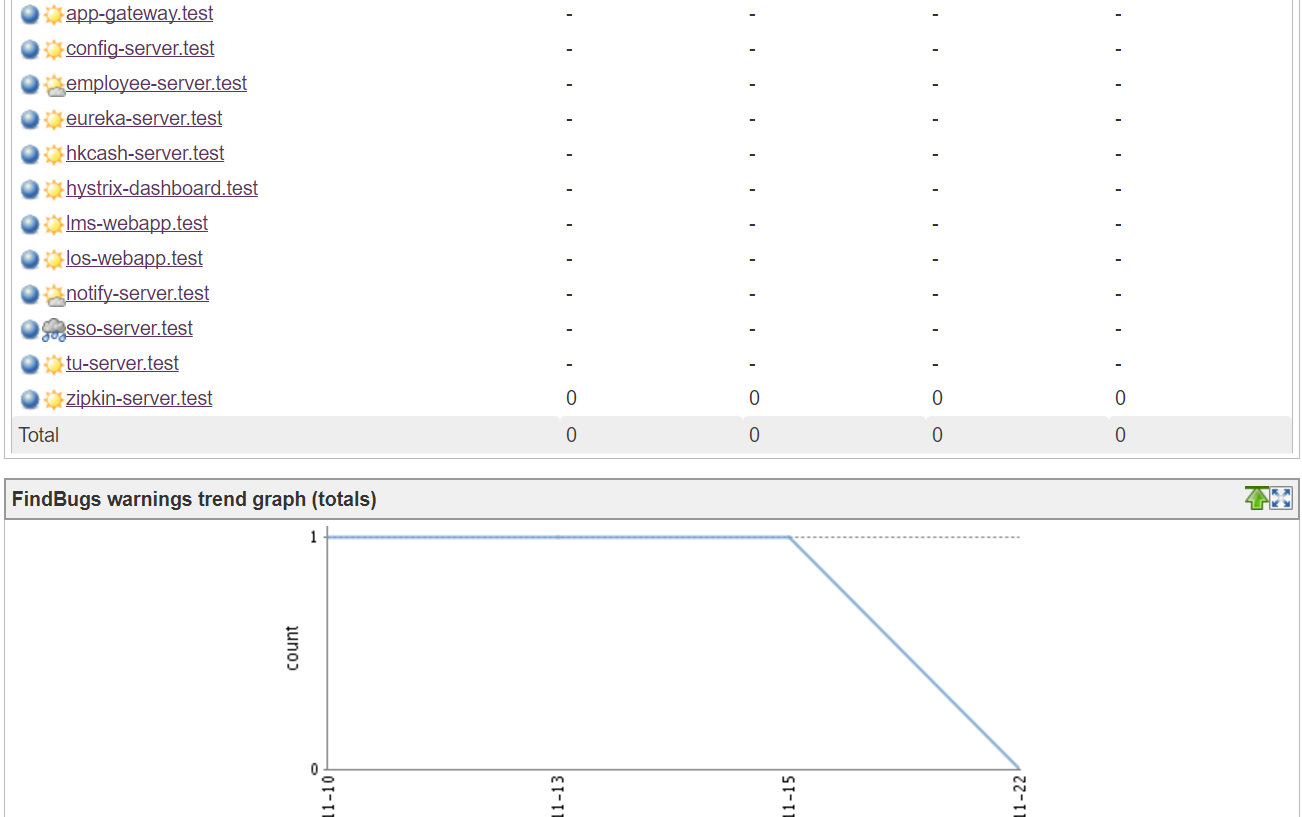
在首页显示代码质量扫描的结果:

jenkins-config9

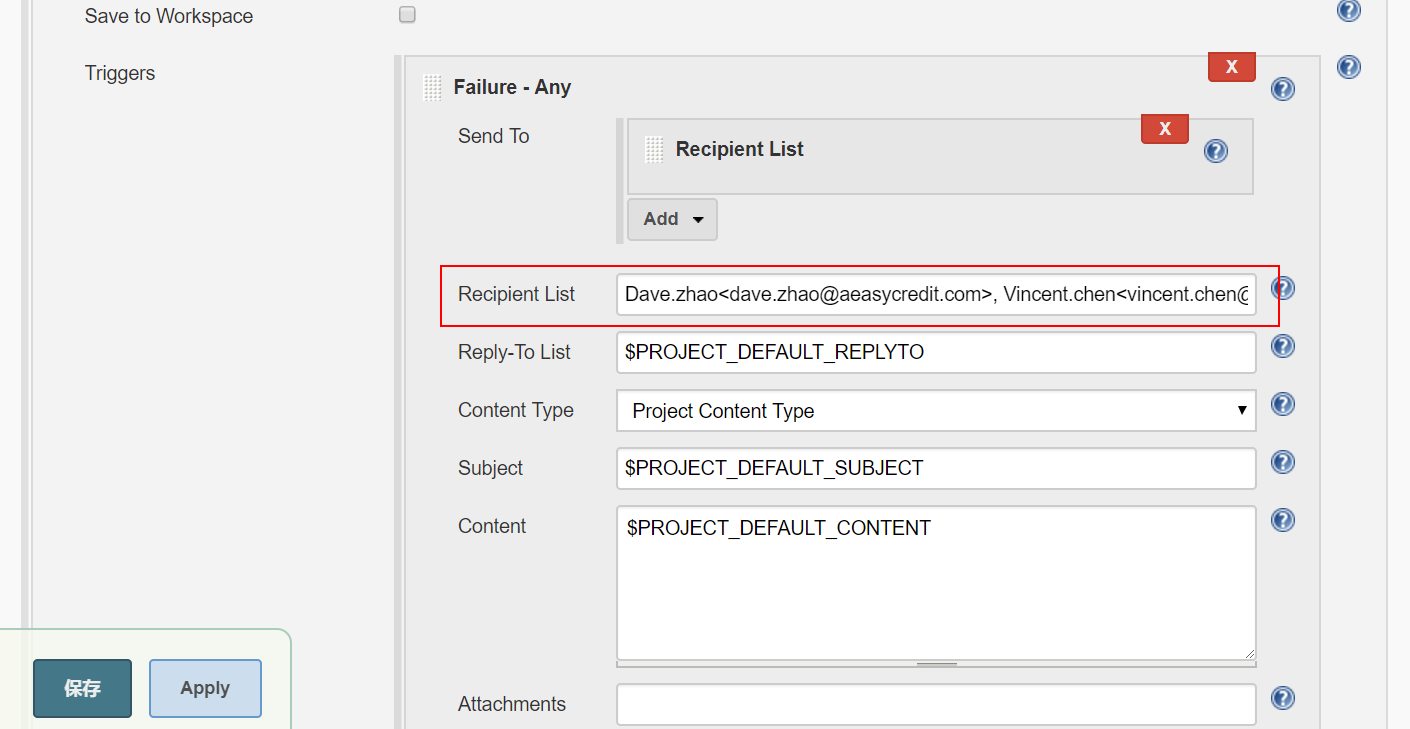
Editable Email Notification

jenkins-config7

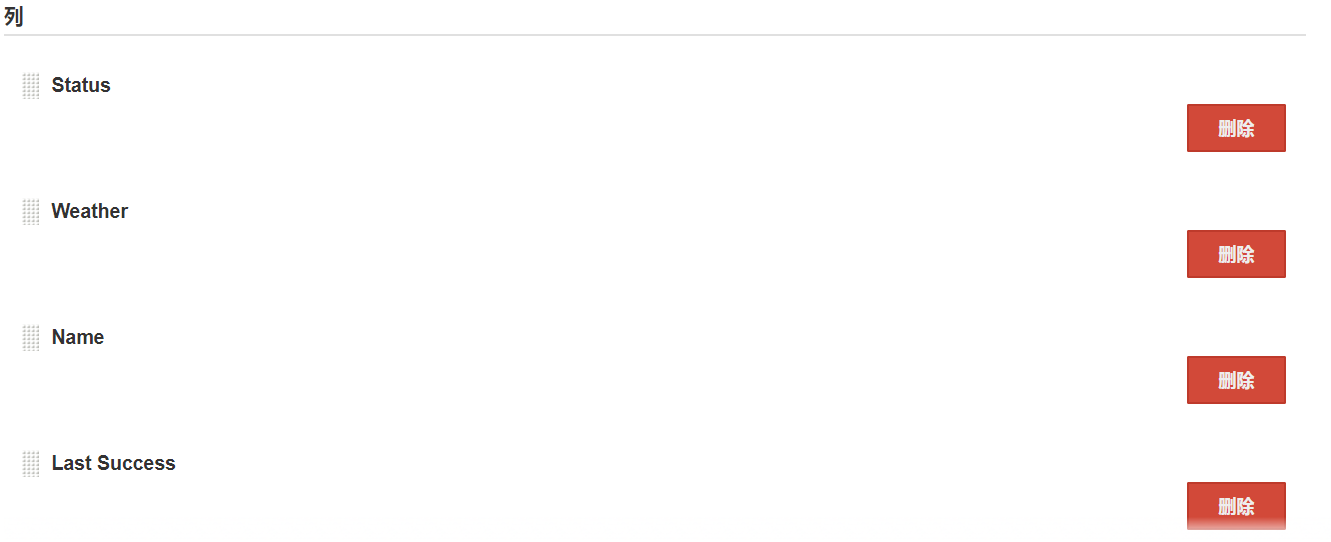
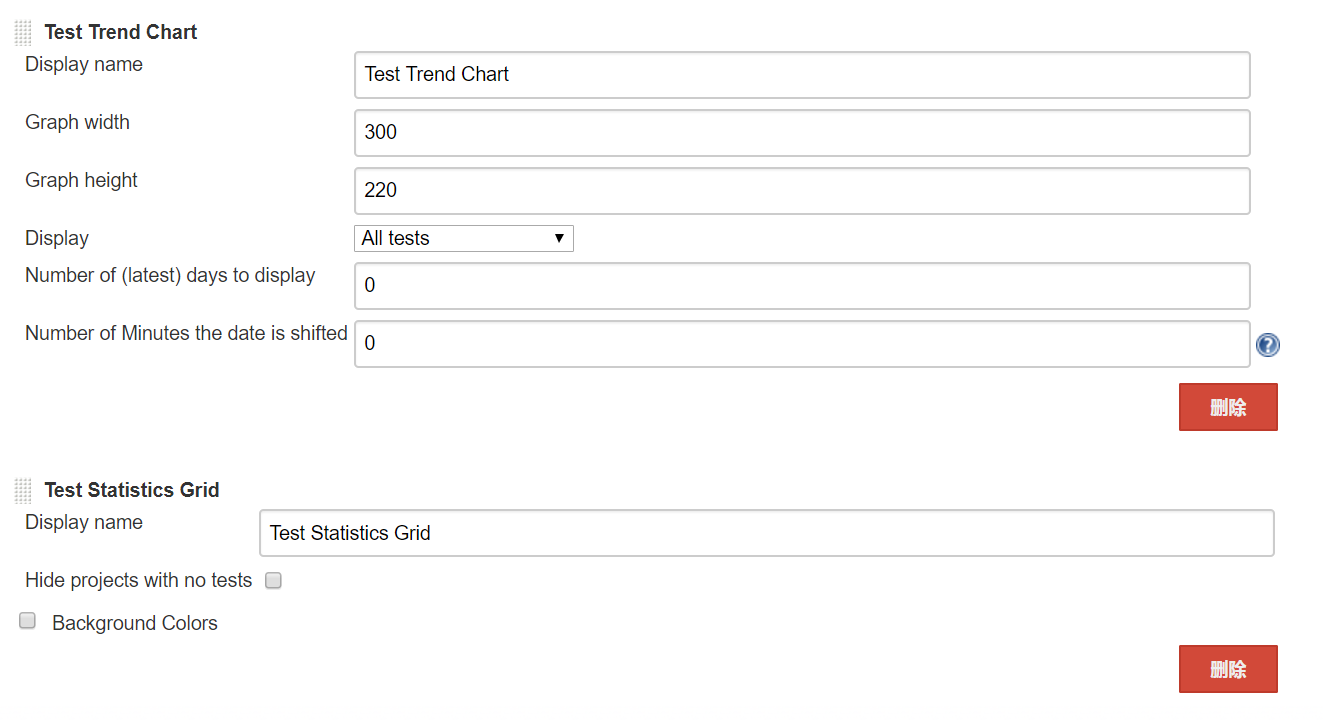
Jenkins视图设置

jenkins-view-config1

jenkins-view-config2

jenkins-view-config3

jenkins-view-config4

jenkins-view-config5

jenkins-view-config6

jenkins-view-config7

jenkins-view-config8

效果如下:

jenkins-view-effective1.png

jenkins-view-effective2.png

权限控制

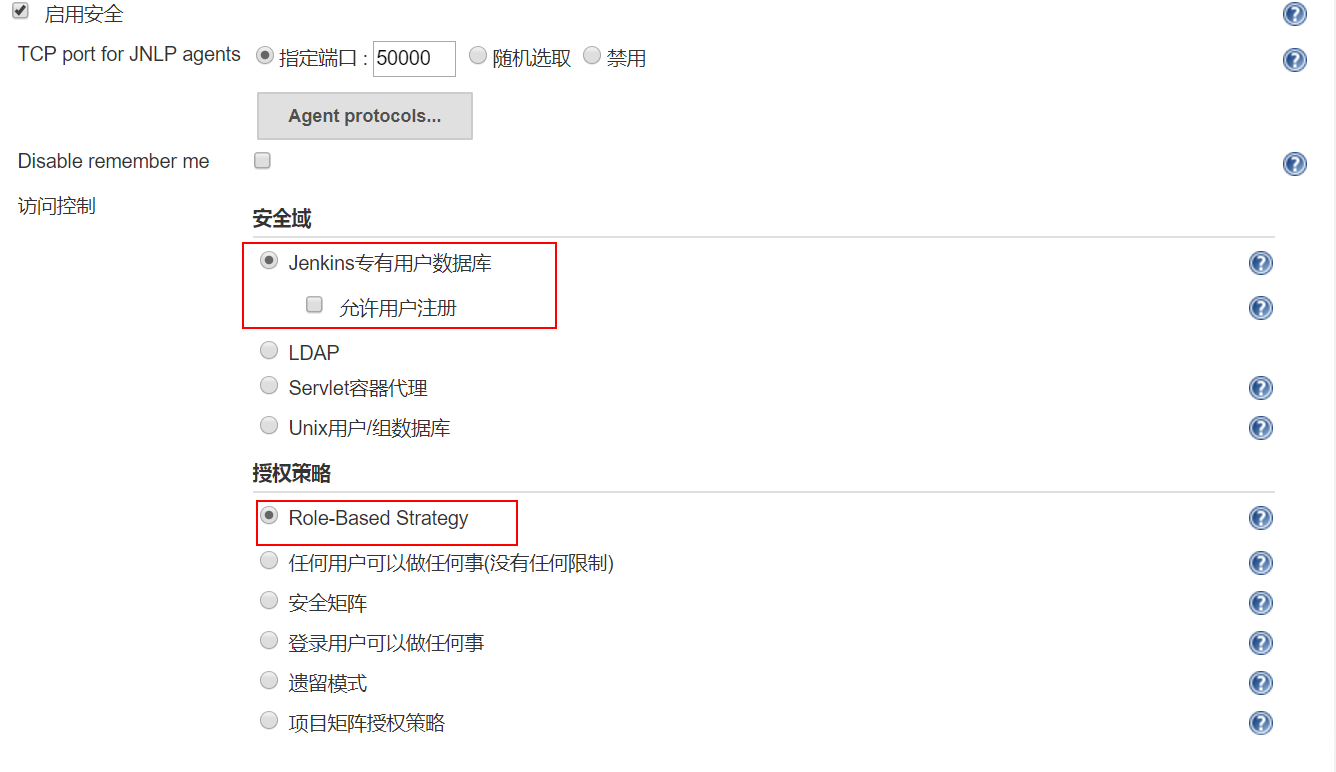
Configure Global Security

jenkins-config-security

Manage and Assign Roles

Manage Roles

jenkins-roles

重点说明一下Project roles:
默认dev role是没有Build job的权限,可以在具体的project中配置,比如说允许dev build以.test结尾的项目:

1
^.*\.test$

或者只允许dev build不以.test开头的项目:

1
^(?!hkcash).+$

或者只允许dev build不以.test结尾的项目:

1
^.*\.(?<!test)$

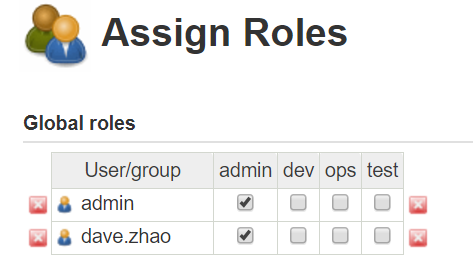
Assign Roles

jenkins-assign-roles1

jenkins-assign-roles2

Configuration Slicing

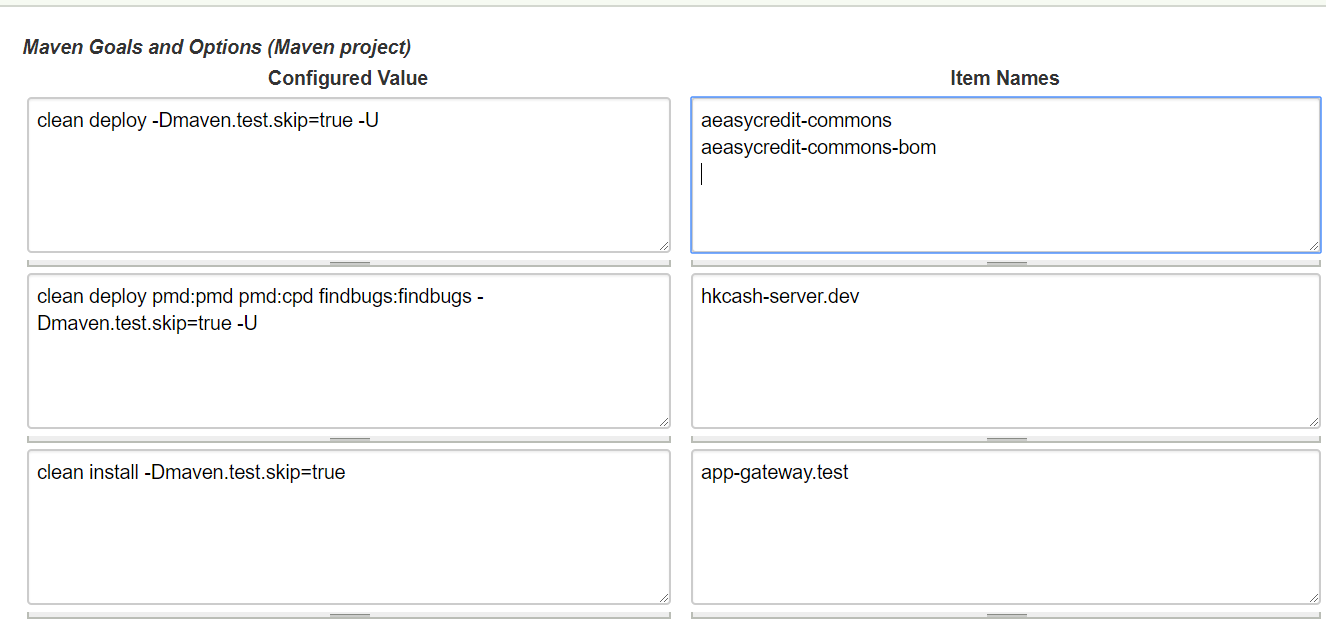
如果项目太多的话,修改每个项目的配置太痛苦,可以通过Slicing批量修改。比如要修改Maven Goals and Options:
jenkins-scling-config